
本記事は Kong Blog の記事を翻訳し転載しています。
2025 年7月31日 読了時間 6 分

Claudio Acquaviva
Kong、プリンシパル アーキテクト
このシリーズの過去 2 回では、「Kong AI Gateway による ReAct AI エージェントの強化方法」とKong AI Gateway と LangGraph による単一 LLM AI エージェントの構築方法」について解説してきました。3 回目となるこの最終回では、AI エージェントを複数の LLM に対応させ、それらにまたがるセマンティック ルーティング ポリシーを実装することで、さらに進化させます。今回のブログ記事では、他の 生成AI インフラストラクチャに対応する Kong AI Gateway 3.11 で導入された新機能についても探ります。
マルチ LLM ReAct AI エージェント
このブログ記事のセクションでは、アーキテクチャをもう一度進化させ、OpenAI に加えて、Gatewayの背後に Mistral と Anthropic という 2 つの新しい LLM インフラストラクチャを追加します。
マルチ LLM のシナリオとユース ケース
主なシナリオでは、エージェントはニーズに応じて、複数の LLM と選択的に通信する必要があります。Kong AI Gateway が通信を仲介することで、次のようなメリットが得られます。
- コスト、レイテンシー、信頼性、そして主にセマンティクス (特定のトピックに強い LLM、コーディングに強い LLM など) に基づいて、使用する LLM を決定する。
- クエリを適切な LLM にルーティングする。
- 結果に基づいて行動する。
- フォールバックと冗長性 : 1 つの LLM が失敗や遅延した場合に、別の LLM を使用する。
セマンティック ルーティング アーキテクチャ
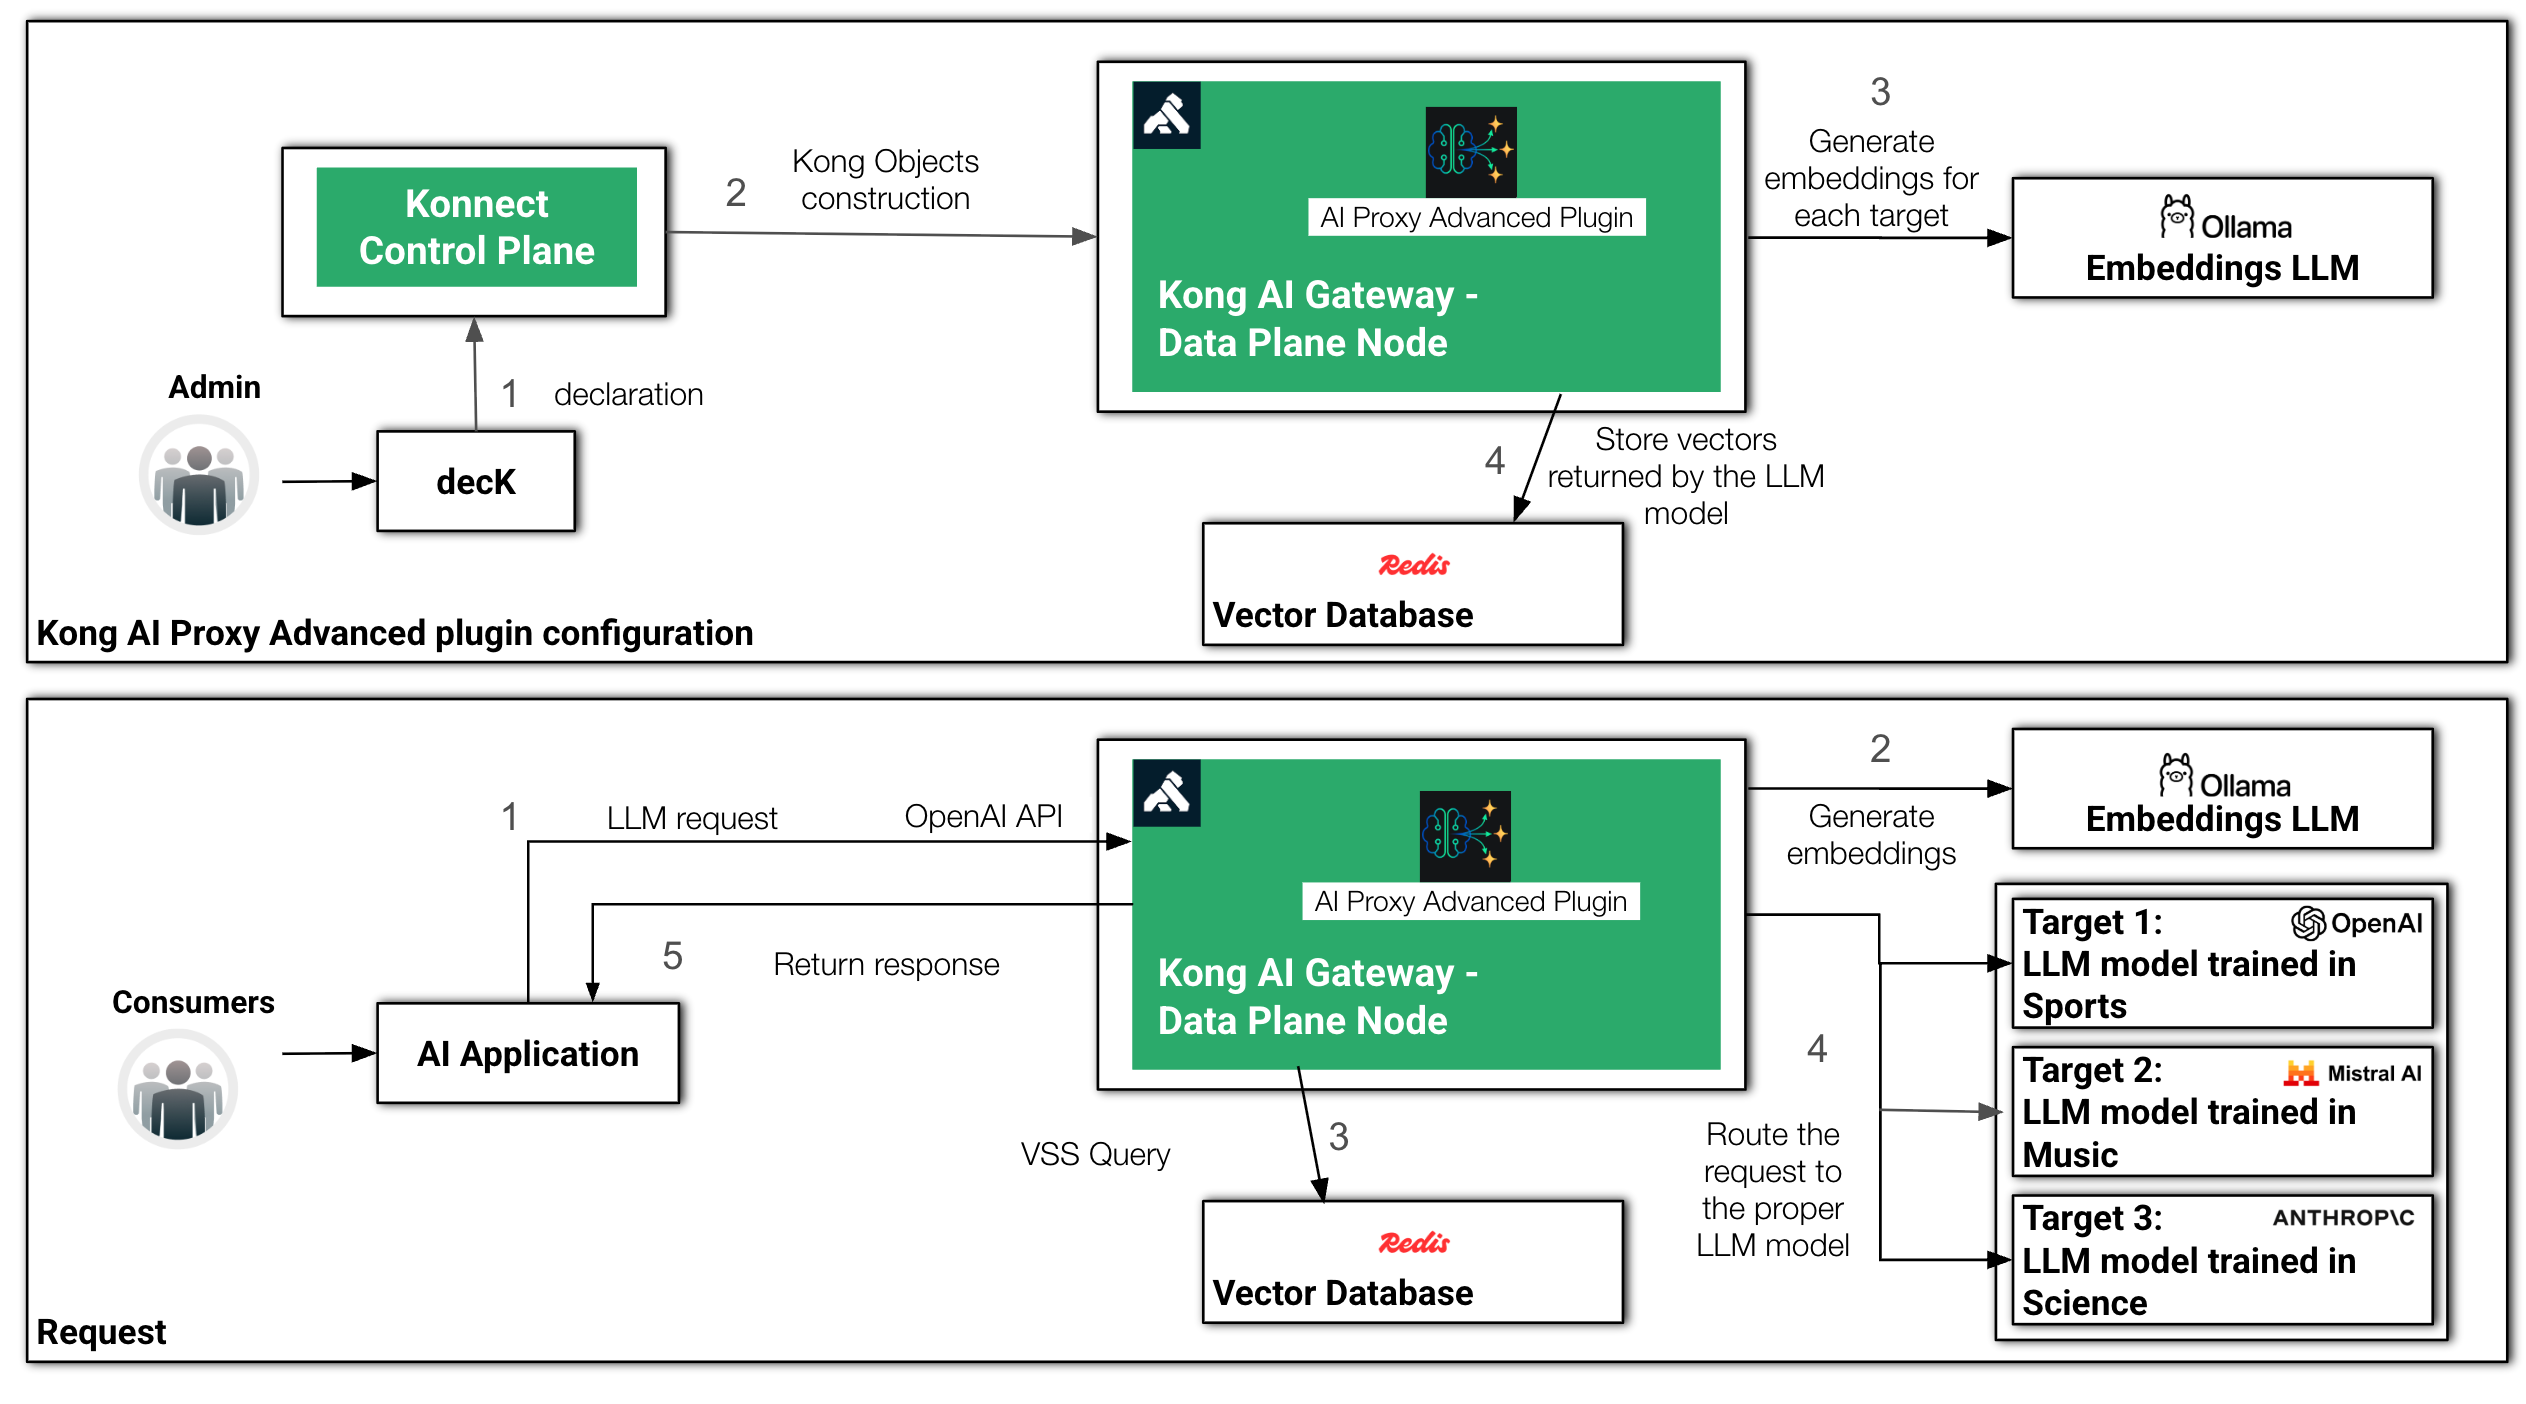
Kong AI Gateway は、キャッシュやプロンプト ガードなど、さまざまなセマンティック機能を備えています。マルチ LLM エージェント インフラストラクチャを実装するために、このブログ記事シリーズ全体で使用してきた AI Proxy Advanced プラグインが提供するセマンティック ルーティング機能を使用します。
AI Proxy Advanced プラグインには、プロンプトと各モデルの記述との間のセマンティクスや類似性に基づいてリクエストを分散するなど、さまざまなロード バランシング ポリシーを実装する機能があります。たとえば、3 つのモデルがあるとします。1 つ目はスポーツ、2 つ目は音楽、3 つ目は科学のトレーニングをされています。ここで私たちがしたいことは、各プロンプトが提示したトピックに基づいて、リクエストを適切にルーティングすることです。
設定時に起こることは、Konnect コントロールプレーン に decK 宣言を送信することで、プラグインは各記述のembeddindsモデルに対して、埋め込みをベクトル データベースに保存します。
その後、受信するリクエストごとに、プラグインはベクトル データベースに ベクトル類似検索(もしくは、仮想類似性検索)をサブミットし、どの LLM にリクエストをルーティングすべきかを決定します。
セマンティック ルーティングの設定とリクエスト処理時間
Redis
セマンティック ルーティング アーキテクチャを実装するために、Redis-stack Helm チャートを使用して、Redis をベクトル データベースとして利用します。
helm repo add redis-stack https://redis-stack.github.io/helm-redis-stack
help repo update

helm install redis-stack redis-stack/redis-stack -n redis --create-namespace
Ollama
今回使用するEmbedding モデルとして、Ollamaがローカル環境で管理する mxbai-embed-large:latest モデルを利用します。インストールには、OllamaのHelmチャートを使用してください。
helm repo add ollama-helm https://otwld.github.io/ollama-helm/
helm repo update

helm install ollama ollama-helm/ollama \
-n ollama \
  --create-namespace \
  --set ollama.models.pull[0]="mxbai-embed-large:latest" \
  --set service.type=LoadBalancer
Python スクリプト
この最後の AI エージェント Python スクリプトには、次に挙げる 2 つの大きな変更点があります。
- ツールを新しい関数に置き換えました。
- get_music: Event Registry サービスを利用して、音楽コンサートを探します。
- Get_traffic: Tavily サービスにリクエストを送信し、交通情報を取得します。
- get_weather: 以前と同じく、公開されている OpenWeather サービスに関わるものです。
- グラフを構築するための LangGraph 呼び出しを、事前構築済みの別の LangGraph 関数である create_react_agent に置き換えます。
事前構築済みの create_react_agent 関数は、以前プログラムで作成した基本的な ReAct グラフを実装するのに非常に便利です。このエージェントは以下で構成されることになります。
- LLM にリクエストを送信するノード
- このノードに関連付けられ、LLM からのレスポンスを受け取った際にエージェントがどのように進むべきかを決定する conditional_edge
- ツールを呼び出すためのノード
実際、graph.get_graph().draw_ascii() 関数でグラフの出力を再度表示すると、以前のバージョンのエージェントと同じグラフ構造が表示されます。
from langgraph.prebuilt import create_react_agent
from langchain_openai import ChatOpenAI
from langchain_core.tools import tool
from langchain_community.utilities.openweathermap import OpenWeatherMapAPIWrapper
import httpx

@tool
def get_weather(location: str):
    """Call to get the weather from a specific location."""
    print("starting get_weather function")
    openweathermap_url = kong_dp + "/openweathermap-route"
    result = httpx.get(openweathermap_url, params={"q": location})
    print("finishing get_weather function")
    return result.json()

@tool
def get_music_concert(location: str):
    """Call to get the events in a given location."""
    print("starting get_music_concerts function")
    searchevent_url = kong_dp + "/searchevent-route"
    location = location.replace(" ", "_")
    data={
        "query": {
            "$query": {
                "$and": [
                    {
                        "categoryUri": "dmoz/Arts/Music/Bands_and_Artists"
                    },
                    {
                        "locationUri": f"http://en.wikipedia.org/wiki/{location}"
                    }
                ]
            },
            "$filter": {
                "forceMaxDataTimeWindow": "31"
            }
        },
        "resultType": "events",
        "eventsSortBy": "date",
        "eventImageCount": 1,
        "storyImageCount": 1
    }
    result = httpx.post(searchevent_url, json=data)
    print("finishing get_music_concert function")
    return result.json()["events"]["results"][0]["concepts"][0]["label"]["eng"]

@tool
def get_traffic(location: str):
    """Call to get the traffic situation of a given location."""
    print("starting get_traffic function")
    traffic_url = kong_dp + "/tavily-traffic-route"
    data={"query": f"Generally, what is the worst time of day for car traffic in {location}", "search_depth": "advanced"}
    result = httpx.post(traffic_url, json=data)
    print("finishing get_traffic function")
    return result.json()["results"][0]["content"]

tools = [get_weather, get_music_concert, get_traffic]

kong_dp = "http://127.0.0.1"
agent_url = kong_dp + "/agent-route"

client = ChatOpenAI(base_url=agent_url, model="", api_key="dummy", default_headers={"apikey": "123456"})

graph = create_react_agent(client, tools)
print(graph.get_graph().draw_ascii())

def print_stream(stream):
    for s in stream:
        message = s["messages"][-1]
        if isinstance(message, tuple):
            print(message)
        else:
            message.pretty_print()

inputs = {"messages": [("user", "In my next vacation, I'm planning to visit the city where Jimi Hendrix was born? Is there any music concert to see? Also provide weather and traffic information about the city")]}
print_stream(graph.stream(inputs, stream_mode="values"))
この実行では、音楽に関連するリクエストであるため、AI Proxy Advanced プラグインはリクエストを Mistral にルーティングします。
decK 宣言
以下で、セマンティック ルーティングのユース ケースの新しい decK 宣言を確認できます。AI Proxy Advanced プラグインには、次のセクションが設定されています。
- embeddings: プラグインが LLM モデルに関連する embeddings を生成するために向かうべき場所。
- vectordb: embeddings を保存し、VSS クエリを処理する役割。
- targets: 各 LLM モデルのエントリー。最も重要な設定は 記述 であり、プラグインがリクエストをどこにルーティングすべきかを定義します。
さらに、この宣言は AI Prompt Decorator プラグインを適用するため、Gatewayは LLM に温度を摂氏に変換するよう要求します。
_format_version: "3.0"
_info:
  select_tags:
  - agent
_konnect:
  control_plane_name: ai-gateway
services:
- name: openweathermap-service
  url: https://api.openweathermap.org/data/2.5/weather
  routes:
  - name: openweathermap-route
    paths:
    - /openweathermap-route
    plugins:
    - name: request-transformer
      instance_name: request-transformer-openweathermap
      config:
        add:
          querystring:
          - "appid:<your_openweathermap_api_key>"
- name: searchevent-service
  url: https://eventregistry.org/api/v1/event/getEvents
  routes:
  - name: searchevent-route
    paths:
    - /searchevent-route
    plugins:
    - name: request-transformer
      instance_name: request-transformer-events
      config:
        add:
          body:
          - "apiKey:<your_event_search_api_key>"
- name: tavily-trafficservice
  url: https://api.tavily.com/search
  routes:
  - name: tavily-traffic-route
    paths:
    - /tavily-traffic-route
    plugins:
    - name: request-transformer
      instance_name: request-transformer-tavily-traffic
      config:
        add:
          headers:
          - "Authorization:Bearer <your_tavely_api_key>"
- name: agent-service
  host: httpbin.default
  port: 8000
  routes:
  - name: agent-route1
    paths:
    - /agent-route
    plugins:
    - name: ai-proxy-advanced
      instance_name: "ai-proxy-advanced-agent"
      enabled: true
      config:
        balancer:
          algorithm: semantic
        embeddings:
          model:
            provider: openai
            name: mxbai-embed-large
            options:
              upstream_url: "http://ollama.ollama:11434/v1/embeddings"
        vectordb:
          dimensions: 1024
          distance_metric: cosine
          strategy: redis
          threshold: 0.8
          redis:
            host: redis-stack.redis.svc.cluster.local
            port: 6379
        targets:
        - model:
            provider: "openai"
            name: "o3-mini"
          auth:
            header_name: "Authorization"
            header_value: "Bearer <your_openai_api_key>"
          route_type: "llm/v1/chat"
          description: "sports, soccer, football, basketball, beisebol"
          logging:
            log_payloads: true
            log_statistics: true
        - model:
            provider: "mistral"
            name: "mistral-large-latest"
            options:
              mistral_format: "openai"
              upstream_url: "https://api.mistral.ai/v1/chat/completions"
          auth:
            header_name: "Authorization"
            header_value: "Bearer <your_mistral_api_key>"
          route_type: "llm/v1/chat"
          description: "piano, orchestra, liszt, classical music, rock, pop music"
          logging:
            log_payloads: true
            log_statistics: true
        - model:
            provider: "anthropic"
            name: "claude-3-7-sonnet-20250219"
            options:
              anthropic_version: "2023-06-01"
              max_tokens: 200
          auth:
            header_name: "x-api-key"
            header_value: "<your_anthropic_api_key>"
          route_type: "llm/v1/chat"
          description: "science, physics, relativity theory, mathematics, algebra, calculus, trigonometry"
          logging:
            log_payloads: true
            log_statistics: true
   - name: ai-prompt-decorator
     instance_name: ai-prompt-decorator1
     enabled: true
     config:
       prompts:
         prepend:
         - role: system
           content: "You are a helpful AI assistant, please convert temperatures to Celsius."
   - name: key-auth
     instance_name: key-auth1
     enabled: true
consumers:
- keyauth_credentials:
  - key: "123456"
  username: user1
  plugins:
  - name: ai-rate-limiting-advanced
    instance_name: ai-rate-limiting-advanced-consumer1
    enabled: true
    config:
      llm_providers:
      - name: openai
        window_size:
        - 60
        limit:
        - 800
Grafana ダッシュボード
GitHub リポジトリで利用可能な Grafana ダッシュボードをダウンロードしてインストールします。これには 2 つのタイルがあります。
- 各 Kong ルートのリクエスト カウンター
- 各 LLM モデルのリクエスト カウンター
このダッシュボードは、Prometheus プラグインによって生成されるメトリクスに完全に基づいています。設定は 2 つのパートに分かれています。
- AI Proxy Advanced プラグイン (次のパラメーターを使用)
  ```
   logging:
              log_payloads: true
              log_statistics: true
``` - Prometheus プラグイン (次のパラメーターを使用)
ai_metrics: true
Prometheus プラグインによって生成されたメトリクスに基づく Grafana ダッシュボード
LangGraph サーバー
AI エージェントの最終バージョンが完成したので、それに基づいて LangGraph サーバーを構築します。LangGraph サーバーを実行するには複数のデプロイメント オプションがありますが、ここではスタンドアロン コンテナーと呼ばれるデプロイメントで、独自の Minikube クラスターを使用します。
詳細については、以下のリンクを参照してください。
エージェントの Docker イメージ
最初のステップは、サーバー用の Docker イメージを作成することです。以下のコードでは、グラフを実行する行を削除しています。もう 1 つの変更点は、Kubernetes FQDN サービスを参照するように Kong データ プレーンのアドレスを変更したことです。
from langgraph.prebuilt import create_react_agent
from langchain_openai import ChatOpenAI
from langchain_core.tools import tool
from langchain_community.utilities.openweathermap import OpenWeatherMapAPIWrapper
import httpx

@tool
def get_weather(location: str):
    """Call to get the weather from a specific location."""
    print("calling get_weather function")
    openweathermap_url = kong_dp + "/openweathermap-route"
    result = httpx.get(openweathermap_url, params={"q": location})
    return result.json()

@tool
def get_music_concerts(location: str):
    """Call to get the events in a given location."""
    print("calling get_music_concerts function")
    searchevent_url = kong_dp + "/searchevent-route"
    location = location.replace(" ", "_")
    data={
        "query": {
            "$query": {
                "$and": [
                    {
                        "categoryUri": "dmoz/Arts/Music/Bands_and_Artists"
                    },
                    {
                        "locationUri": f"http://en.wikipedia.org/wiki/{location}"
                    }
                ]
            },
            "$filter": {
                "forceMaxDataTimeWindow": "31"
            }
        },
        "resultType": "events",
        "eventsSortBy": "date",
        "eventImageCount": 1,
        "storyImageCount": 1
    }
    result = httpx.post(searchevent_url, json=data)
    return result.json()["events"]["results"][0]["concepts"][0]["label"]["eng"]

@tool
def get_traffic(location: str):
    """Call to get the traffic situation of a given location."""
    print("calling get_traffic function")
    traffic_url = kong_dp + "/tavily-traffic-route"
    data={"query": f"Generally, what is the worst time of day for car traffic in {location}", "search_depth": "advanced"}
    result = httpx.post(traffic_url, json=data)
    return result.json()["results"][0]["content"]

tools = [get_weather, get_music_concerts, get_traffic]
#kong_dp = "http://127.0.0.1"
kong_dp = "http://proxy1.kong"
agent_url = kong_dp + "/agent-route"

client = ChatOpenAI(base_url=agent_url, model="", api_key="dummy", default_headers={"apikey": "123456"})

graph = create_react_agent(client, tools)
langgraph.json
Docker イメージには、依存関係とコード内のグラフ変数名 (この例では graph) を記述した langgraph.json ファイルが必要です。
{
  "dependencies": [
    ".",
    "langchain_openai",
    "langchain_community"
  ],
  "graphs": {
    "agent": "./langgraph_react_kong.py:graph"
  }
}
Docker イメージの作成
“langgraph” CLI コマンドを使用してイメージを作成します。これには、環境に Docker がインストールされている必要があります。
langgraph build --platform linux/arm64 -t claudioacquaviva/langgraph-kong1または、
langgraph build --platform linux/amd64 -t claudioacquaviva/langgraph-kong1Docker Hub にプッシュします。
docker push claudioacquaviva/langgraph-kong1エージェントのデプロイメント
利用可能な Helm チャートを使用して LangGraph サービスをインストールします。
helm repo add langchain https://langchain-ai.github.io/helm/values.yaml では、サービスに LoadBalancer を定義して、利用可能にします。現在、Postgres のみが LangGraph サーバーのデータベースとしてサポートされており 、同様にRedis のみが タスク キューとしてサポートされています。このファイルは、Kubernetes にデプロイメントするために Postgres リソースを指定します。最後に、LangGraph サーバーには LangSmith API キーが必要です。LangSmith は、サーバーを監視するために使用するプラットフォームです。LangSmith にログインして API キーを作成してください。
cat > values.yaml << 'EOF'
images:
  apiServerImage:
    pullPolicy: Always
    repository: claudioacquaviva/langgraph-kong1
    tag: latest

config:
  langGraphCloudLicenseKey: ""

studio:
  enabled: false

postgres:
  statefulSet:
    resources:
      limits:
        cpu: 500m
        memory: 1Gi
      requests:
        cpu: 500m
        memory: 1Gi

apiServer:
  service:
    type: LoadBalancer
    httpPort: 8090
  deployment:
    extraEnv:
      - name: LANGSMITH_API_KEY
        value: "<your_langsmith_api_key>"
EOF
LangGraph サーバーをデプロイします。
helm install langgraph-cloud langchain/langgraph-cloud \
  -n langgraph \
  --create-namespace \
  --values values.yaml
アンインストールする場合は、以下を実行します。
helm uninstall langgraph-cloud -n langgraph
kubectl delete pvc data-langgraph-cloud-postgres-0 -n langgraph
LangGraph サーバー API
LangGraph サーバーがデプロイされたら、その API を使用してグラフにリクエストを送信できます。
次のコマンドでアシスタントを検索します。
% curl -s -X POST http://0.0.0.0:8090/assistants/search \
  --header 'Content-Type: application/json' \
  --data '{
  "metadata": {},
  "graph_id": "",
  "limit": 10,
  "offset": 0
}' | jq
レスポンスは次のようになると思います。
[
  {
    "assistant_id": "fe096781-5601-53d2-b2f6-0d3403f7e9ca",
    "graph_id": "agent",
    "created_at": "2025-04-28T15:26:37.723363+00:00",
    "updated_at": "2025-04-28T15:26:37.723363+00:00",
    "config": {},
    "metadata": {
      "created_by": "system"
    },
    "version": 1,
    "name": "agent",
    "description": null
  }
]
アシスタントの名前を使用してグラフを呼び出します。
curl -s http://localhost:8090/runs/wait \
--header 'Content-Type: application/json' \
--data '{
    "assistant_id": "agent",
    "input": {
        "messages": [{"role": "user", "content": "In my next vacation, I''m planning to visit the city where Jimi Hendrix was born? Is there any music concert to see? Also provide weather and traffic information about the city."}]
    }
}' | jq -r '.messages[5].content'
レスポンスは次のようになると思います。
In Seattle, it is currently overcast with a temperature of 69.8°F (20.4°C) and feels like 68.9°F (20.5°C). The city has a humidity of 80% and wind speed of 4.12 mph from the west. There is a music concert of Phish happening in the city, but be aware that the worst period of travel is generally Thursday afternoons, especially 4-6 pm.Kong AI Gateway 3.11 と新しい 生成AI モデルへの対応
Kong AI Gateway 3.11 では、LLM 以外にも、動画や画像などを含む他の 生成AI インフラストラクチャも対応できるようになります。次の図は、対応する新しいモードの一覧です。

以下は、AI Proxy Advanced プラグインを有効にして、text-to-image モデルである OpenAI の Dall-E 2 を保護するKong ルート宣言の例です。
 - name: img-openai
    strip_path: true
    paths:
    - "/img/openai"
    plugins:
    - name: ai-proxy-advanced
      config:
        genai_category: image/generation
        targets:
        - route_type: image/v1/images/generations
          auth:
            header_name: "Authorization"
            header_value: ""
            allow_override: false
          logging:
            log_payloads: false
            log_statistics: true
          model:
            name: dall-e-2
            provider: openai
これを実現するために、Kong AI Gateway 3.11 では次のような新しい設定パラメーターが定義されています。
- genai-category: ゲートウェイが保護する 生成AI インフラストラクチャを設定するために使用します。
Image/generationに加えて、たとえば、通常の LLM 用のtext/generationや embedding モデル用のtext/embeddings、音声認識や音声テキスト変換などを実装する音声ベースのモデル用のaudio/speechやaudio/transcriptionに対応します。 - route_type: この既存のパラメーターが拡張され、次のような新しいタイプに対応します。
- LLM :
llm/v1/responses、llm/v1/assistants、llm/v1/files、llm/v1/batches - イメージ :
image/v1/images/generations、image/v1/images/edits - 音声 :
audio/v1/audio/speech、audio/v1/audio/transcriptions、audio/v1/audio/translations - Realtime :
realtime/v1/realtime
- LLM :
まとめ
今回のブログ記事では、Kong AI Gateway と LangGraph を使用した基本的な AI エージェントをご紹介しました。ベクトル データベースとして Redis を使用し、Embedding モデルを提供するインフラストラクチャとしてローカルの Ollama を使用しました。
Gatewayの背後には 3 つの LLM インフラストラクチャ (OpenAI、Mistral、Anthropic) を配置し、AI エージェントは 3 つの外部関数をツールとして使用しました。
Gatewayは、LLM インフラストラクチャを抽象化し、レート制限や API キーなどの特定のポリシーで外部関数を保護する役割を担っています。
Kong AI Gateway のページで、利用可能なすべての機能をご確認ください。
原文:How to Build a Multi-LLM AI Agent with Kong AI Gateway and LangGraph


Kong AI Gateway:
マルチLLM導入を簡素化。ガバナンスと制御のためのAIネイティブゲートウェイ。