本記事は Kong Blog の記事を翻訳し転載しています。

Claudio Acquaviva
Kong、プリンシパル アーキテクト
2025 年 7 月 24 日 読了時間 22分
以前の記事では、Kong AI Gateway を使って基本的な AI エージェントを実装する方法について説明しました。このシリーズのパート 2 では、LangGraph の基本を再確認して AI エージェントを書き直し、Kong AI Gateway を使って LLM インフラストラクチャと外部関数を保護する方法を探ります。
LangGraph の基本
ご存じのとおり、このエージェントは OpenAI パッケージのみを使用して作成されています。これは、「そのままの)」エージェントが動作するのを確認する場合には良いアプローチと言えます。しかし、以下のようないくつかの理由から、何らかのフレームワークを利用してエージェントを作成することを検討してください。たとえば、AI エージェントの複雑さ、セキュリティ、外部システムや環境との統合、そして言うまでもなく開発時間といった要素が、すぐに必須要件となるでしょう。これを支援する目的で、現在マーケットプレイスでは LlamaIndex、AutoGen、CrewAI、LangGraph など、AI エージェント フレームワークの選択肢がいくつも提供されています。
LangGraph は大きな注目を集めているため、ここでは特に Kong AI Gateway がどのようにLangGraphと連携できるかを見てみることにしましょう。
LangGraph と LangChain
LangChain は、LLM やその他のコンポーネントと対話するための標準的なインターフェイスを備えており、単純なチェーンや検索フローに役立ちます。LangGraph は AI エージェント用のフレームワークであり、LangChain の構成要素よりも低レベルで制御性が高いものです。LangChain のクラスを使用せずに、LangGraph だけで動作させることもまったく問題ありません。
OpenAI RESTful リクエスト
それでは、この LangGraph 用語集ページで示されている LangGraph の主な概念を探求する、基本で簡単なアプリケーションから始めましょう。これは完全なエージェントの実装ではなく、LangGraph の構成要素を使い始めて基本的なグラフを作成するコードである点にご注意ください。
最初の LangGraph スクリプトは、この非常にシンプルな OpenAI RESTful リクエストをベースにしています。OPENAI_API_KEY 環境変数に OpenAI API キーを設定していることを確認してください。
curl https://api.openai.com/v1/chat/completions \
  -H "Content-Type: application/json" \
  -H "Authorization: Bearer $OPENAI_API_KEY" \
  -d '{
    "model": "gpt-4",
    "messages": [
      {
        "role": "user",
        "content": "What''s the longitude and latitude of Seattle"
      }
    ]
  }'
次のような結果が得られます。
{
  "id": "chatcmpl-BO3x47lZx2TLcgGsgLx7rGchcIB9m",
  "object": "chat.completion",
  "created": 1745074762,
  "model": "gpt-4-0613",
  "choices": [
    {
      "index": 0,
      "message": {
        "role": "assistant",
        "content": "The latitude and longitude of Seattle, Washington, USA is approximately 47.6062° N, 122.3321° W.",
        "refusal": null,
        "annotations": []
      },
      "logprobs": null,
      "finish_reason": "stop"
    }
  ],
  "usage": {
    "prompt_tokens": 14,
    "completion_tokens": 29,
    "total_tokens": 43,
    "prompt_tokens_details": {
      "cached_tokens": 0,
      "audio_tokens": 0
    },
    "completion_tokens_details": {
      "reasoning_tokens": 0,
      "audio_tokens": 0,
      "accepted_prediction_tokens": 0,
      "rejected_prediction_tokens": 0
    }
  },
  "service_tier": "default",
  "system_fingerprint": null
}
LangGraph Python スクリプト
このリクエストに相当する LangGraph Python スクリプトは次のようになります。
from typing import TypedDict
from langgraph.graph import StateGraph, START, END

class State(TypedDict):
    messages: str
    response: str

def node_1(state: State) -> State:
    completions = client.chat.completions.create(
        model="gpt-4",
        messages=state["messages"]
    )
    return {"response": completions.choices[0].message.content}

builder = StateGraph(State)
builder.add_node("node_1", node_1)
builder.add_edge(START, "node_1")
builder.add_edge("node_1", END)

graph = builder.compile()
print(graph.get_graph().draw_ascii())

from openai import OpenAI
import os
client = OpenAI(
    api_key = os.getenv("OPENAI_API_KEY")
)

text = "What's the longitude and latitude of Seattle"
state = {"messages": [{"role": "user", "content": text}], "response": ""}

print("State before invoking the graph")
print(state)
print("-----\n")

print("Invoking the graph")
state = graph.invoke(state)
print("-----\n")

print("State after invoking the graph")
print(state)
print("-----\n")
実行する前に、次の Python パッケージをインストールしていることを確認してください。
langgraphopenai
これで、結果として次のように表示されるはずです。
+-----------+
| __start__ |
+-----------+
      *
      *
      *
  +--------+
  | node_1 |
  +--------+
      *
      *
      *
 +---------+
 | __end__ |
 +---------+
State before invoking the graph
{'messages': [{'role': 'user', 'content': "What's the longitude and latitude of Seattle"}], 'response': ''}
-----

Invoking the graph
-----

State after invoking the graph
{'messages': [{'role': 'user', 'content': "What's the longitude and latitude of Seattle"}], 'response': 'The latitude and longitude of Seattle, Washington, USA is approximately 47.6062° N, 122.3321° W.'}
-----
LangGraph の主な構成要素
Richard J. Trudeau は、その独創的な著書『Introduction to Graph Theory (グラフ理論入門)』において、グラフを次のように簡潔に定義しています。「グラフとは、『vertex set (頂点集合)』と『edge set (辺集合)』と呼ばれる 2 つの集合からなるオブジェクトである。頂点集合は有限の空(から)でない集合である。辺集合は空であってもよいが、そうでなければその要素は頂点セットの 2 要素の部分集合である。」言い換えれば、グラフとは、辺によって接続された頂点 (ノードとも呼ばれる) の集合からなるデータ構造と言えます。ここに 5 つの頂点 (ノード) と 6 つの辺を持つグラフを示します。
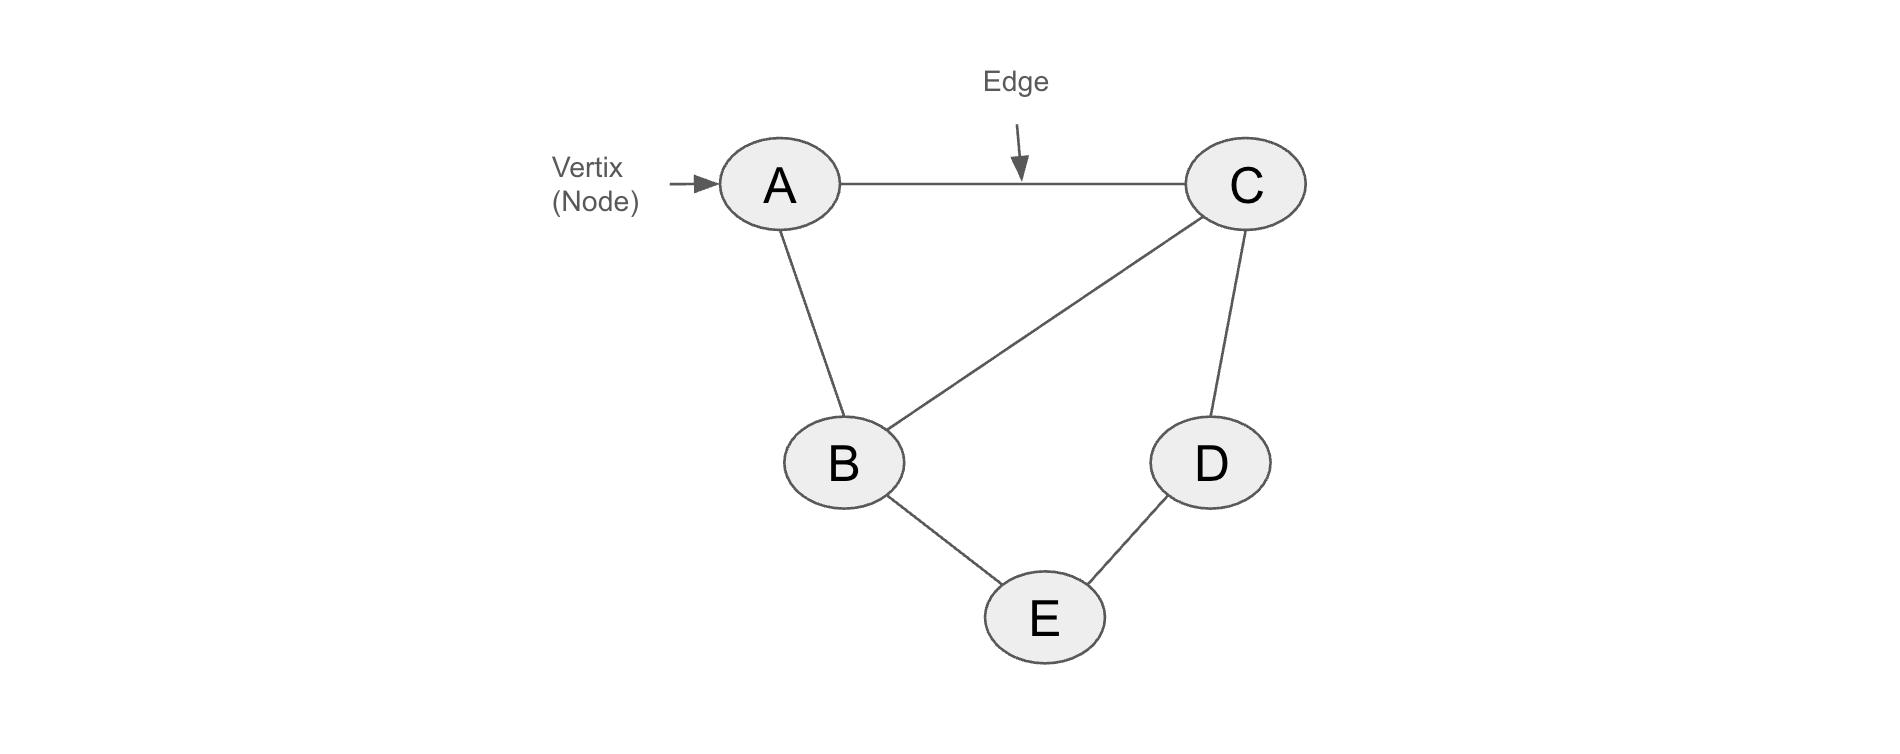
5 つの頂点 と 6 つの辺を持つ基本的なグラフ
LangGraph は基本的にエージェントをグラフとして表現します。グラフは次の 3 つの主要なコンポーネントで構築されます。
- ノード (Nodes): グラフ内での処理または意思決定の基本単位。
- エッジ (Edges): 特定のノードの実行が終了した後、次に実行すべきノードを決定します。
- ステート (State): グラフの現在のコンテキストを表す構造化されたデータ オブジェクト。
ノードとエッジを組み合わせることで、実行中にステートを更新するエージェントを構築できます。LangGraph の用語集のページに記載されているように、ノードが作業を行い、エッジが次に何をすべきかを指示します。
これらのコードを見てみると、次のような主な構成要素があります。
- START および END ノードと定数 : ユーザー入力をグラフに送信するノードと、終端ノードを表します。
- State クラス : グラフのステートを表し、スキーマ (この例では「messages」と「response」) と、グラフのステータス更新を行う reducer 関数で構成されます。この例では、reducer 関数が定義されていないため、LangGraph はキーに対するすべての更新がそれを上書きすると仮定します。オプションで、たとえばキーを上書きするのではなく新しい値を追加するための reducer 関数を持つこともできます。スキーマは、Python の TypedDict または Pydantic モデルを使用して定義できます。
- StateGraph クラス : すべてのノードとエッジを持つグラフを定義し、コンパイルする場所です。これは CompiledStateGraph オブジェクトを返します。基本的なグラフのコードでは複数のノードがないため、単純にフローが流れます。次のセクションでは、「条件付きエッジ」を追加して、処理の次のステップがどのノードに進むべきかを制御できるようにします。
- get_graph() メソッド : このメソッドは Graph オブジェクトを返し、その draw_ascii() メソッドではグラフにぴったりな視覚的な表現ができます。
- CompiledStateGraph.invoke() メソッド : このグラフにはループがなく、単一の出力を返すため、invoke メソッドで十分です。推論ループを持つ ReAct AI エージェントの場合、グラフの実行を異なる方法で処理する必要があります。次のセクションでそのようなグラフを実装について説明します。
Tool calling (Function calling)
お気づきかもしれませんが、このシンプルな AI エージェントは、そのロジックが完全にコード内に限定され、自己完結しています。もちろん、エージェントによって呼び出される唯一の外部コンポーネントは GPT-4 モデルです。
これは通常、もう少し高度なエージェントを考える際には大きな制約となります。AI エージェントが外部の関数やシステム、API を呼び出すことを可能にするメカニズムが必要となります。それがツールの主な目的です。
たとえば OpenAI には、Web 検索、ファイル検索、コンピューター利用、Function calling という 4 種類の組み込みツールが備わっています。このうち最後の関数呼び出しは、エージェントが外部の機能と連携して呼び出すために一般的に使用されます。他の例として、Mistral や Anthropic も同様の機能を備えています。
OpenAI の組み込みツール
ツールと LLM モデルがどのように連携して動作するかを説明するために、GPT-4 にリクエストをいくつか送信してみましょう。AI エージェントのコードに、次の 2 つの関数が定義されているとします。
- get_weather: 指定された都市の天気情報を返します。
- get_composer: 特定の楽曲の作曲者を返します。
問題は、AI エージェントが受け取るプロンプトに応じて、どちらの関数を呼び出すべきか分からないことです。そこで、AI エージェントは LLM モデルにリクエストを送信し、そこから返ってくるレスポンスがエージェントの動作を決定します。
この状況ようになる呼び出し例は以下のとおりです。最初のリクエストは、input パラメーターに受け取ったプロンプトを含んでいます。tools パラメーターには、2 つの関数がそれぞれの説明とともに配列として含まれています。これを送信するとどうなるのか見てみましょう。
curl -s https://api.openai.com/v1/responses \
-H "Content-Type: application/json" \
-H "Authorization: Bearer $OPENAI_API_KEY" \
-d '{
    "model": "gpt-4",
    "input": "Who wrote the Hungarian Rapsodies?",
    "tools": [
        {
            "type": "function",
            "name": "get_weather",
            "description": "Call to get the weather from a specific location.",
            "parameters": {
                "type": "object",
                "properties": {
                    "location": {
                        "type": "string",
                        "description": "City and country e.g. Bogotá, Colombia"
                    }
                },
                "required": [
                    "location"
                ],
                "additionalProperties": false
            }
        },
        {
            "type": "function",
            "name": "get_composer",
            "description": "Call to get the composer of a specific piece.",
            "parameters": {
                "type": "object",
                "properties": {
                    "piece": {
                        "type": "string",
                        "description": "Name of the composer of a classical piece e.g. Beethoven''s 5th Symphony"
                    }
                },
                "required": [
                    "piece"
                ],
                "additionalProperties": false
            }
        }
    ]
}' | jq '.output'
output フィールドの内容は次のとおりです。これは AI エージェントに対して、呼び出し元により良いレスポンスを返すために、指定された引数で関数を呼び出すよう指示しています。
[
  {
    "id": "fc_680a9768943c81919427d5b9272bf31a0ad325331b90322b",
    "type": "function_call",
    "status": "completed",
    "arguments": "{\n  \"piece\": \"Hungarian Rhapsodies\"\n}",
    "call_id": "call_aotUalsZrtfqCxle0qaLgwFX",
    "name": "get_composer"
  }
]
Tool calling (Function calling) :LangGraph と LangChain を使用した Kong バージョン
AI Gateway の背後に OpenAI のモデルを配置したまま、LangGraph を使用してツール リクエストを送信する Python スクリプトを実行してみましょう。このコードが LangChain のクラスも使用していることが分かります。
同時に、オブザーバビリティ(可観測性)の観点でいうと、LLMモデルとの間で送受信されるリクエストやレスポンスだけでなく、処理される前後の本文を確かめるのも興味深いと思います。
以下は、このアーキテクチャの新しいコンポーネントを示した図です。
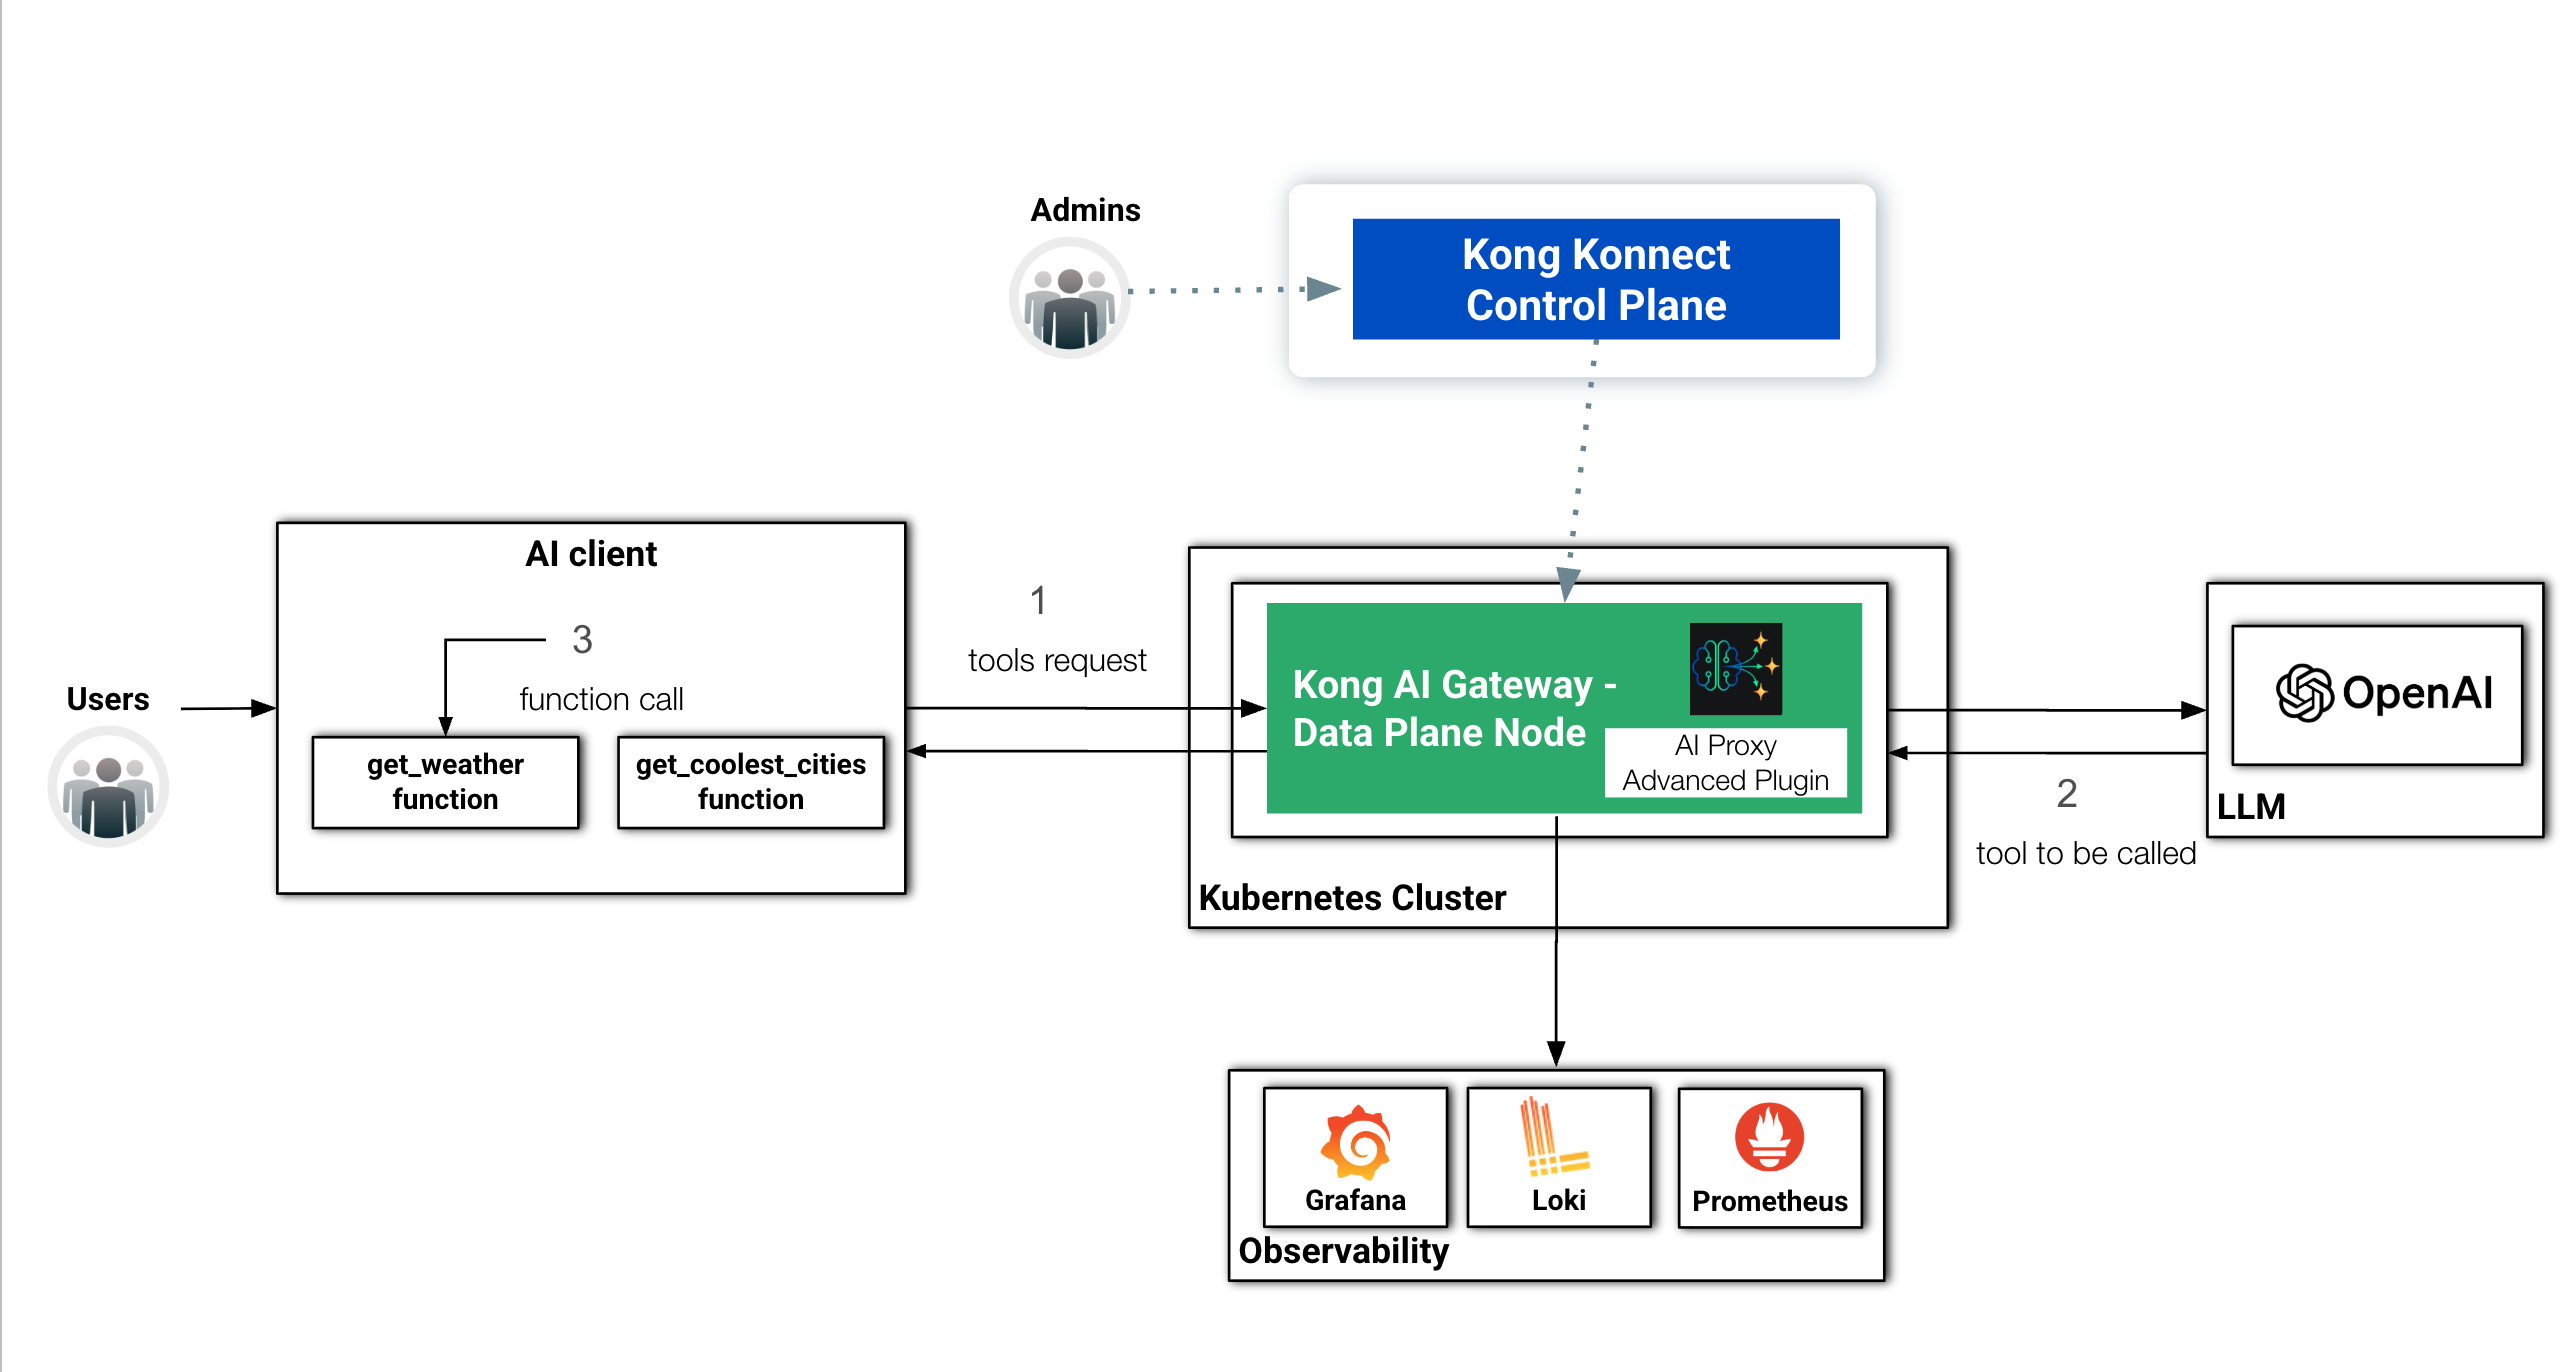
新しいオブザーバビリティ レイヤーと LangGraph ツールを備えた基本アーキテクチャ
オブザーバビリティ レイヤー
Tool calling (Function calling) のユース ケースで Kong バージョンを扱う前に、環境にオブザーバビリティ レイヤーを構築します。構成要素は以下のとおりです。
- Loki: 最も重要なコンポーネントであり、ログ処理の役割を担い、Kong AI Gateway データプレーンが処理するすべてのリクエストとレスポンスを受信します。
- Prometheus: Kong AI Gateway が生成するメトリクスを収集して保存する役割を担います。
- Grafana: ログとメトリクスをクエリし、分析するために使用します。
Loki のインストール
まずは Helm チャートから
helm repo add grafana https://grafana.github.io/helm-charts
helm repo update
次の Helm コマンドで Loki をインストールします。ロードバランサーで公開しているため、Minikube はポート 3100 用の新しいトンネルを開始します。
helm install loki -n loki grafana/loki-stack \
--create-namespace \
--set loki.image.tag=2.9.13 \
--set loki.service.type=LoadBalancer \
--set loki.service.port=3100 \
--set promtail.enabled=false
このポートにアクセスして、Loki がリクエストを受け入れる準備ができていることを確認します。
% http :3100/ready
HTTP/1.1 200 OK
Content-Length: 6
Content-Type: text/plain; charset=utf-8
Date: Fri, 25 Apr 2025 17:21:19 GMT
X-Content-Type-Options: nosniff

ready
アンインストールする場合は、次を実行します。
helm uninstall loki -n loki
kubectl delete namespace loki
Prometheus と Grafana のインストール
Prometheus コミュニティ ディストリビューションには Grafana が組み込まれているため、1つのコマンドで両方をインストールできます。まず Helm チャートを追加します。
helm repo add prometheus-community https://prometheus-community.github.io/helm-chartsインストール後、同様に 2 つの新しい Minikube トンネルが定義されているはずです。
helm install prometheus -n prometheus prometheus-community/kube-prometheus-stack \
--create-namespace \
--set alertmanager.enabled=false \
--set prometheus.service.type=LoadBalancer \
--set prometheus.service.port=9090 \
--set grafana.service.type=LoadBalancer \
--set grafana.service.port=3000 \
--set prometheus.prometheusSpec.serviceMonitorSelectorNilUsesHelmValues=false
アンインストールする場合は、次を実行します。
helm uninstall prometheus -n prometheus
kubectl delete namespace prometheus
デフォルトでは、Grafana 管理者の資格情報は admin/prom-operator です。
必要であれば、Kong は API (id: 7424) と AI Gateway (ai: 21162) の両方向けの Grafana ダッシュボードを提供しています。
macOS では、次のようにして Grafana を開くことができます。
open -a "Google Chrome" "http://localhost:3000"Prometheus ServiceMonitor
以下の宣言では、Prometheus が Kong のメトリクスを取得するために使用する Prometheus ServiceMonitor を作成します。
cat <<EOF | kubectl apply -f -
apiVersion: monitoring.coreos.com/v1
kind: ServiceMonitor
metadata:
  name: kong
  namespace: kong
  labels:
    app.kubernetes.io/name: kong
spec:
 selector:
   matchLabels:
     gateway-operator.konghq.com/dataplane-service-type: ingress
 endpoints:
 - targetPort: metrics
   scheme: http
 jobLabel: kong
 namespaceSelector:
   matchNames:
     - kong
EOF
削除する場合は、次を実行します。
kubectl delete servicemonitor kong -n kongKong のオブザーバビリティ プラグイン
次に、データプレーンが Prometheus と Loki にエクスポートするオブザービリティ シグナルを生成するための Kong プラグインを設定する必要があります。
以下の deck 宣言では、3 つのプラグインを設定します。詳細については、各ドキュメントを確認してください。
- Prometheus: データプレーンが API および AI Gateway 関連のメトリクスを生成するようにします。
- HTTP Log: データプレーンによって処理されたすべてのリクエストを、ログ エントリーとしてプッシュします。Loki は、ここ (https://grafana.com/docs/loki/latest/reference/loki-http-api/#ingest-logs) でお分かりのように、特定の JSON フォーマットを要求します。そのため、HTTP Log プラグインの設定をカスタマイズして対応する必要があります。custom_fields_by_lua 設定パラメーターで定義されている Lua コードが、その役割を果たします。このプラグインは、Kubernetes サービスの FQDN を使用して Loki にリクエストを送信する点に留意してください。
- Pre-Function: HTTP Log プラグインがログを Loki に送信する前に、リクエストとレスポンスの本文をログ エントリーに挿入します。
プラグインを設定するための宣言が含まれている kong-agent-observability.yaml ファイルをダウンロードします。HTTP Log および Pre-Function プラグインで設定されたコードで使用される一部の Lua 関数では、特定のデータプレーン設定が必要です。ご記憶の方もいらっしゃるかと思いますが、データプレーンは、これらの関数をリスト化した untrusted_lua_sandbox_requires パラメーターを使ってデプロイされました。次のコマンドで宣言を適用できます。
deck gateway sync --konnect-token $PAT ./kong-agent-observability.yamlLangGraph と LangChain を使用した Kong バージョン
それでは、LangGraph と LangChain を使用して、Kong AI Gateway によって保護された Tool calling (Function calling) を実行する、新しい Python スクリプトを見ていきましょう。なお、これは Tool calling (Function calling) をテストするためのコードであり、実際にエージェントを実装するものではないことに注意してください。
from langchain_openai import ChatOpenAI
from langchain_core.tools import tool
from langgraph.prebuilt import ToolNode

kong_dp = "http://localhost:80"
agent_url = kong_dp + "/agent-route"

client = ChatOpenAI(base_url=agent_url, model="", api_key="dummy")

@tool
def get_weather(location: str):
    """Call to get the weather from a specific location."""
    if any([city in location.lower() for city in ["sf", "san francisco"]]):
        return "It's sunny in San Francisco, but you better look out if you're a Gemini 😈."
    else:
        return f"I am not sure what the weather is in {location}"

@tool
def get_coolest_cities():
    """Get a list of coolest cities"""
    return "nyc, sf"

tools = [get_weather, get_coolest_cities]
client = client.bind_tools(tools)

client_response = client.invoke("What's the weather in San Francisco?").tool_calls
print(client_response)
このコードには、新しく重要な抽象化が含まれています。
- 基本的な OpenAI クラスを LangChain の ChatOpenAI に変更しました。この新しいクラスでは、コード内にあるツールのコレクションをバインドできるため、これは非常に重要です。コンストラクターは、引き続き同じ Kong ルートを参照していることに注意してください。
- このコードでは、@tool デコレーターを使用して、get_weather と get_coolest_cities の 2 つの関数をツールとして定義しています。
- 次の 3 行は、モデルからのレスポンスに応じて、モデルと利用可能なツールを呼び出す役割を果たします。
- 利用可能な関数のリスト
tools = [get_weather, get_coolest_cities]
- LLM モデルを参照する client 変数にリストをバインド
client = client.bind_tools(tools)
- プロンプトを指定してモデルを呼び出し
client_response = client.invoke("What's the weather in San Francisco?").tool_calls
- 利用可能な関数のリスト
コードを実行すると、次の 2 点を確認できます。
- エージェントが示す実際のレスポンス
- Kong AI Gateway のオブザービリティ レイヤーを使用して、LLM モデルに送信されたリクエストとそれに対応するレスポンスを確認する。
以下が AI エージェントのレスポンスです。
[{'name': 'get_weather', 'args': {'location': 'San Francisco'}, 'id': 'call_sK8reJDyzJ6JBeD8QqDpW9gK', 'type': 'tool_call'}]これは、LLM モデルがプロンプトを受け取り、呼び出し元により良いレスポンスを提供するために、エージェントが get_weather 関数をパラメーター location: San Francisco で呼び出すべきであると返したことを意味します。
それでは、Loki のログ エントリーを確認してみましょう。以下は、エージェントから LLM モデルに送信されたリクエストです。ご覧のように、以前 Curl を使って送信したものと非常に似ています。コードで定義した 2 つの関数を含む tools セクションがあります。
curl -G -s http://localhost:3100/loki/api/v1/query_range \
  --data-urlencode 'query={gateway="kong-gateway"}' | jq '.data.result[].values[0][1]' | jq fromjson | jq '.request.body'
{
  "stream": false,
  "model": "",
  "messages": [
    {
      "role": "user",
      "content": "What's the weather in San Francisco?"
    }
  ],
  "tools": [
    {
      "function": {
        "name": "get_weather",
        "parameters": {
          "properties": {
            "location": {
              "type": "string"
            }
          },
          "type": "object",
          "required": [
            "location"
          ]
        },
        "description": "Call to get the weather from a specific location."
      },
      "type": "function"
    },
    {
      "function": {
        "name": "get_coolest_cities",
        "parameters": {
          "properties": {},
          "type": "object"
        },
        "description": "Get a list of coolest cities"
      },
      "type": "function"
    }
  ]
}
以下は、エージェントが LLM モデルから受け取ったレスポンスです。予想通り、get_weather 関数を呼び出すようエージェントに指示しています。エージェントからのレスポンスは、この指示に従った内容となっています。
% curl -G -s http://localhost:3100/loki/api/v1/query_range \
  --data-urlencode 'query={gateway="kong-gateway"}' | jq '.data.result[].values[0][1]' | jq fromjson | jq '.response.body'
{
  "id": "chatcmpl-BQIPtyAVegfM3LoikCESdUDckDC6M",
  "choices": [
    {
      "index": 0,
      "message": {
        "content": null,
        "tool_calls": [
          {
            "id": "call_GYBQsc8M4PGetPEQK3pvfgqz",
            "type": "function",
            "function": {
              "name": "get_weather",
              "arguments": "{\n  \"location\": \"San Francisco\"\n}"
            }
          }
        ],
        "role": "assistant",
        "annotations": {},
        "refusal": null
      },
      "finish_reason": "tool_calls",
      "logprobs": null
    }
  ],
  "system_fingerprint": null,
  "created": 1745607021,
  "service_tier": "default",
  "model": "gpt-4-0613",
  "usage": {
    "prompt_tokens_details": {
      "audio_tokens": 0,
      "cached_tokens": 0
    },
    "total_tokens": 93,
    "completion_tokens_details": {
      "reasoning_tokens": 0,
      "accepted_prediction_tokens": 0,
      "audio_tokens": 0,
      "rejected_prediction_tokens": 0
    },
    "prompt_tokens": 76,
    "completion_tokens": 17
  },
  "object": "chat.completion"
}
もう一度 Kong Analytics ダッシュボードを確認すると、リクエストが1つだけ送信され、処理されたことが分かります。
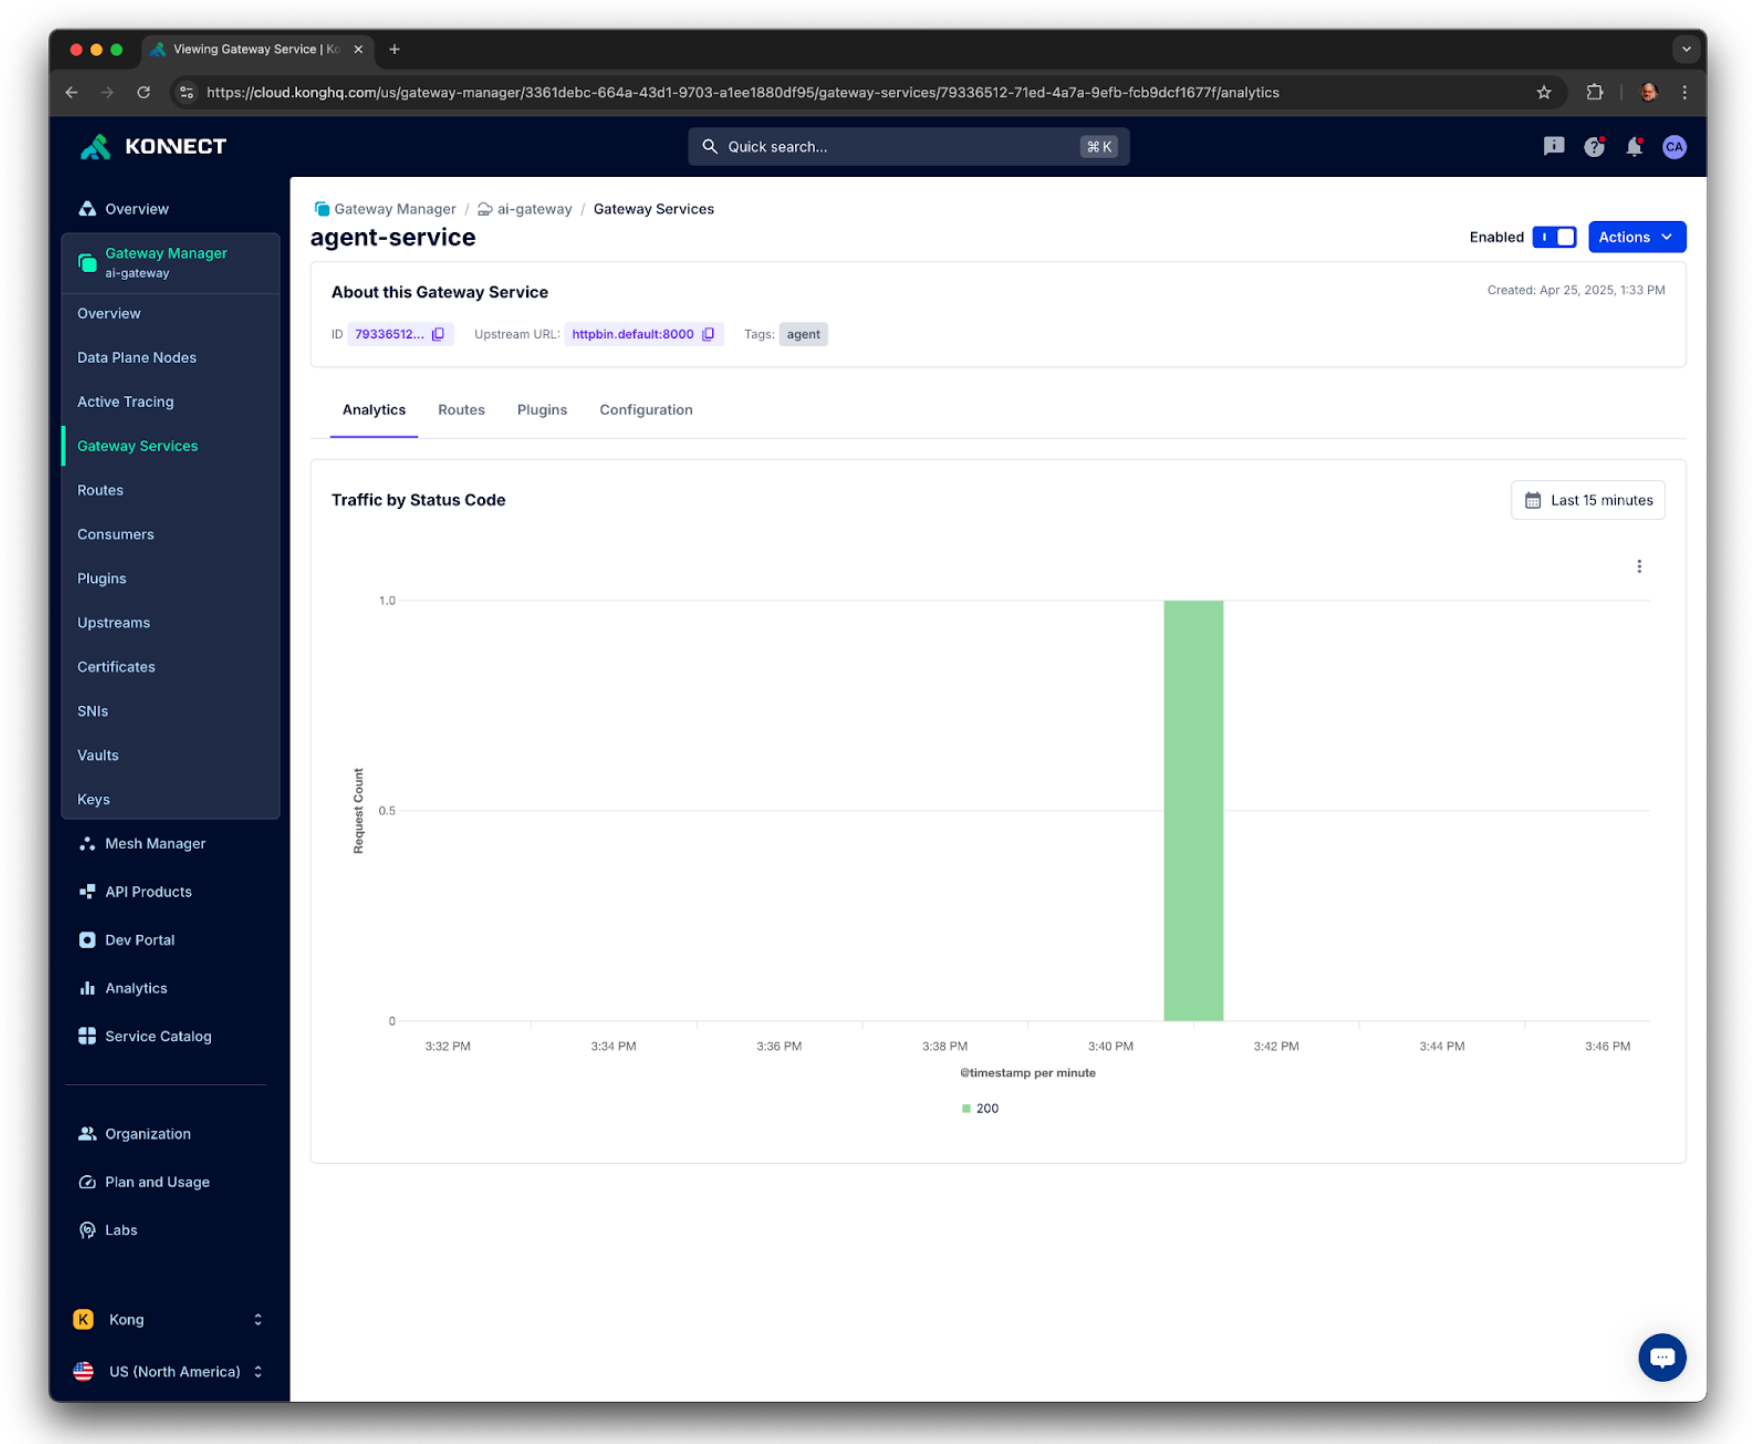
Kong Konnect Analytics
実際の関数を呼び出す
エージェントのコードの行を書き換えてみましょう。LLM モデルにツール リクエストを送信している箇所を、LLMからの指示に基づき、実際の get_weather 関数を呼び出せるようにします。
次の行を変更します。
client_response = client.invoke("What's the weather in San Francisco?").tool_callsこれを次の新しい行に書き換えます。関数をモデルのクライアント参照にバインドする行は、そのまま残しておくことが重要です。
client_response = client.invoke("What's the weather in San Francisco?")
print(client_response)
print("\n")

tool = ToolNode(tools)
response = tool.invoke({"messages": [client_response]})
以下がエージェントのレスポンスです。関数は実際には tool.invoke の行で呼び出されます。client.invoke の行は、そのために適切なパラメーターを返します。
client.invoke は次を返します。
content='' additional_kwargs={'tool_calls': [{'id': 'call_fP7aborYv4d08I86KtgpGGEI', 'function': {'arguments': '{\n "location": "San Francisco"\n}', 'name': 'get_weather'}, 'type': 'function'}], 'refusal': None} response_metadata={'token_usage': {'completion_tokens': 17, 'prompt_tokens': 76, 'total_tokens': 93, 'completion_tokens_details': {'accepted_prediction_tokens': 0, 'audio_tokens': 0, 'reasoning_tokens': 0, 'rejected_prediction_tokens': 0}, 'prompt_tokens_details': {'audio_tokens': 0, 'cached_tokens': 0}}, 'model_name': 'gpt-4-0613', 'system_fingerprint': None, 'id': 'chatcmpl-BQImmdurzZOcBqq9FWHwUhw92UVoP', 'finish_reason': 'tool_calls', 'logprobs': None} id='run-0b6e1ced-c3b7-488b-80e8-5ad4a9b1e3f0-0' tool_calls=[{'name': 'get_weather', 'args': {'location': 'San Francisco'}, 'id': 'call_fP7aborYv4d08I86KtgpGGEI', 'type': 'tool_call'}] usage_metadata={'input_tokens': 76, 'output_tokens': 17, 'total_tokens': 93, 'input_token_details': {'audio': 0, 'cache_read': 0}, 'output_token_details': {'audio': 0, 'reasoning': 0}}tool.invoke は次のように返します。
{'messages': [ToolMessage(content="It's sunny in San Francisco, but you better look out if you're a Gemini 😈.", name='get_weather', tool_call_id='call_fP7aborYv4d08I86KtgpGGEI')]}関数に関連しないプロンプトを送信する
どの関数の記述とも関連しないプロンプトが含まれたリクエストを送信した場合、LLM は通常の message リクエストとして応答します。
たとえば、client.invoke の行を次のように変更してください。
client_response = client.invoke("Tell me about Fermat's last theorem")AI エージェントのレスポンスは次のとおりです。リクエストを満たす適切な関数がないため、LLM がリクエストを処理します。
content="Fermat's Last Theorem is a statement in number theory that was first proposed by Pierre de Fermat in 1637. The theorem states that no three positive integers a, b, and c can satisfy the equation a^n + b^n = c^n for any integer value of n greater than two.\n\nWhile the cases n=1 and n=2 have been known to have infinitely many solutions since antiquity, Fermat claimed that he had a proof for all n, but he never revealed it. For hundreds of years, the theorem puzzled mathematicians, and it became one of the most famous unsolved problems in mathematics.\n\nThe theorem was finally proven by British mathematician Andrew Wiles in 1994. The proof is highly complex and uses many techniques from different areas of mathematics, some of which were not even invented until centuries after Fermat's death. Fermat's Last Theorem has few direct implications in everyday life, but the journey to its proof has led to substantial developments in number theory and algebraic geometry." additional_kwargs={'refusal': None} response_metadata={'token_usage': {'completion_tokens': 210, 'prompt_tokens': 76, 'total_tokens': 286, 'completion_tokens_details': {'accepted_prediction_tokens': 0, 'audio_tokens': 0, 'reasoning_tokens': 0, 'rejected_prediction_tokens': 0}, 'prompt_tokens_details': {'audio_tokens': 0, 'cached_tokens': 0}}, 'model_name': 'gpt-4-0613', 'system_fingerprint': None, 'id': 'chatcmpl-BQJ1oJWYwOdFDnS0X2i6E0JAcyAIv', 'finish_reason': 'stop', 'logprobs': None} id='run-48a213c1-92e3-44f2-b071-48a76ca1177e-0' usage_metadata={'input_tokens': 76, 'output_tokens': 210, 'total_tokens': 286, 'input_token_details': {'audio': 0, 'cache_read': 0}, 'output_token_details': {'audio': 0, 'reasoning': 0}}

{'messages': []}
そして、以下がリクエストとレスポンスの本文です。
% curl -G -s http://localhost:3100/loki/api/v1/query_range \
  --data-urlencode 'query={gateway="kong-gateway"}' | jq '.data.result[].values[0][1]' | jq fromjson | jq '.request.body'
{
  "stream": false,
  "model": "",
  "messages": [
    {
      "role": "user",
      "content": "Tell me about Fermat's last theorem"
    }
  ],
  "tools": [
    {
      "function": {
        "name": "get_weather",
        "parameters": {
          "properties": {
            "location": {
              "type": "string"
            }
          },
          "type": "object",
          "required": [
            "location"
          ]
        },
        "description": "Call to get the weather from a specific location."
      },
      "type": "function"
    },
    {
      "function": {
        "name": "get_coolest_cities",
        "parameters": {
          "properties": {},
          "type": "object"
        },
        "description": "Get a list of coolest cities"
      },
      "type": "function"
    }
  ]
}

% curl -G -s http://localhost:3100/loki/api/v1/query_range \
  --data-urlencode 'query={gateway="kong-gateway"}' | jq '.data.result[].values[0][1]' | jq fromjson | jq '.response.body'
{
  "id": "chatcmpl-BQJ1oJWYwOdFDnS0X2i6E0JAcyAIv",
  "choices": [
    {
      "index": 0,
      "message": {
        "annotations": {},
        "content": "Fermat's Last Theorem is a statement in number theory that was first proposed by Pierre de Fermat in 1637. The theorem states that no three positive integers a, b, and c can satisfy the equation a^n + b^n = c^n for any integer value of n greater than two.\n\nWhile the cases n=1 and n=2 have been known to have infinitely many solutions since antiquity, Fermat claimed that he had a proof for all n, but he never revealed it. For hundreds of years, the theorem puzzled mathematicians, and it became one of the most famous unsolved problems in mathematics.\n\nThe theorem was finally proven by British mathematician Andrew Wiles in 1994. The proof is highly complex and uses many techniques from different areas of mathematics, some of which were not even invented until centuries after Fermat's death. Fermat's Last Theorem has few direct implications in everyday life, but the journey to its proof has led to substantial developments in number theory and algebraic geometry.",
        "refusal": null,
        "role": "assistant"
      },
      "finish_reason": "stop",
      "logprobs": null
    }
  ],
  "system_fingerprint": null,
  "created": 1745609372,
  "service_tier": "default",
  "model": "gpt-4-0613",
  "usage": {
    "total_tokens": 286,
    "prompt_tokens_details": {
      "audio_tokens": 0,
      "cached_tokens": 0
    },
    "prompt_tokens": 76,
    "completion_tokens_details": {
      "audio_tokens": 0,
      "rejected_prediction_tokens": 0,
      "reasoning_tokens": 0,
      "accepted_prediction_tokens": 0
    },
    "completion_tokens": 210
  },
  "object": "chat.completion"
}
Kong AI Gateway プラグイン
以前にも説明した通り、Kong AI Gateway の主な役割の 1 つは、アップストリーム サービス (この場合は LLM モデル) が適切に利用されるように、ポリシーを実装し、適用することです。
例として、次の宣言は 2 つのプラグインを有効にします。
- Key Auth: API キーによるセキュリティ メカニズムを実装します。
- AI Rate Limiting Advanced: LLM モデルに送信されるトークンに基づいて、レート制限ポリシーを実装します。
decK 宣言
kong_agent_simple_plugins.yaml には、新しい decK 宣言が含まれています。
cat > kong_agent_simple_plugins.yaml << 'EOF'
_format_version: "3.0"
_info:
  select_tags:
  - agent
_konnect:
  control_plane_name: ai-gateway
services:
- name: agent-service
  host: localhost
  port: 32000
  routes:
  - name: agent-route1
    paths:
    - /agent-route
    plugins:
    - name: ai-proxy-advanced
      instance_name: "ai-proxy-advanced-openai-agent"
      enabled: true
      config:
        targets:
        - auth:
            header_name: "Authorization"
            header_value: "Bearer <your_OPENAI_API_KEY>"
          route_type: "llm/v1/chat"
          model:
            provider: "openai"
            name: "gpt-4"
    - name: key-auth
      instance_name: key-auth1
      enabled: true
consumers:
- keyauth_credentials:
  - key: "123456"
  username: user1
  plugins:
  - name: ai-rate-limiting-advanced
    instance_name: ai-rate-limiting-advanced-consumer1
    enabled: true
    config:
      llm_providers:
      - name: openai
        window_size:
        - 60
        limit:
        - 800
EOF
この宣言は、AI Rate Limiting Advanced と Key Auth という 2 つの新しいプラグインを適用し、API キーを持つ Kong コンシューマーを作成します。以前と同じ方法で宣言をサブミットできます。
deck gateway sync --konnect-token $PAT ./kong_agent_simple_plugins.yamlKong ルートを保護するために定義された API キーを追加して、ChatOpenAI のコンストラクターの行を変更する必要があります。この新しいコンストラクターは、ChatOpenAI のドキュメントに記載されているように、default_headers パラメーターを使用してこれを実現します。
client = ChatOpenAI(base_url=agent_url, model="", api_key="dummy", default_headers={"apikey": "123456"})この行を変更しない場合、コードは 401 エラーコード(認証エラー)を受け取ります。これは、リクエストに API キーが含まれていないため、Kong ルートを利用する権限がないことを意味しています。さらに、コードを複数回実行すると、最終的に 429 エラーコード(レート制限)を受け取ることになります。これはKongコンシューマーが上限(60秒あたり800トークンというレート制限ポリシーのしきい値)に達したことを意味します。
ツールを備えた LangGraph ReAct AI エージェント
Tool calling (Function calling) に少し慣れてきたところで、LangGraph AI エージェントを強化し、同じツールを追加します。新しいトポロジーは次のとおりです。
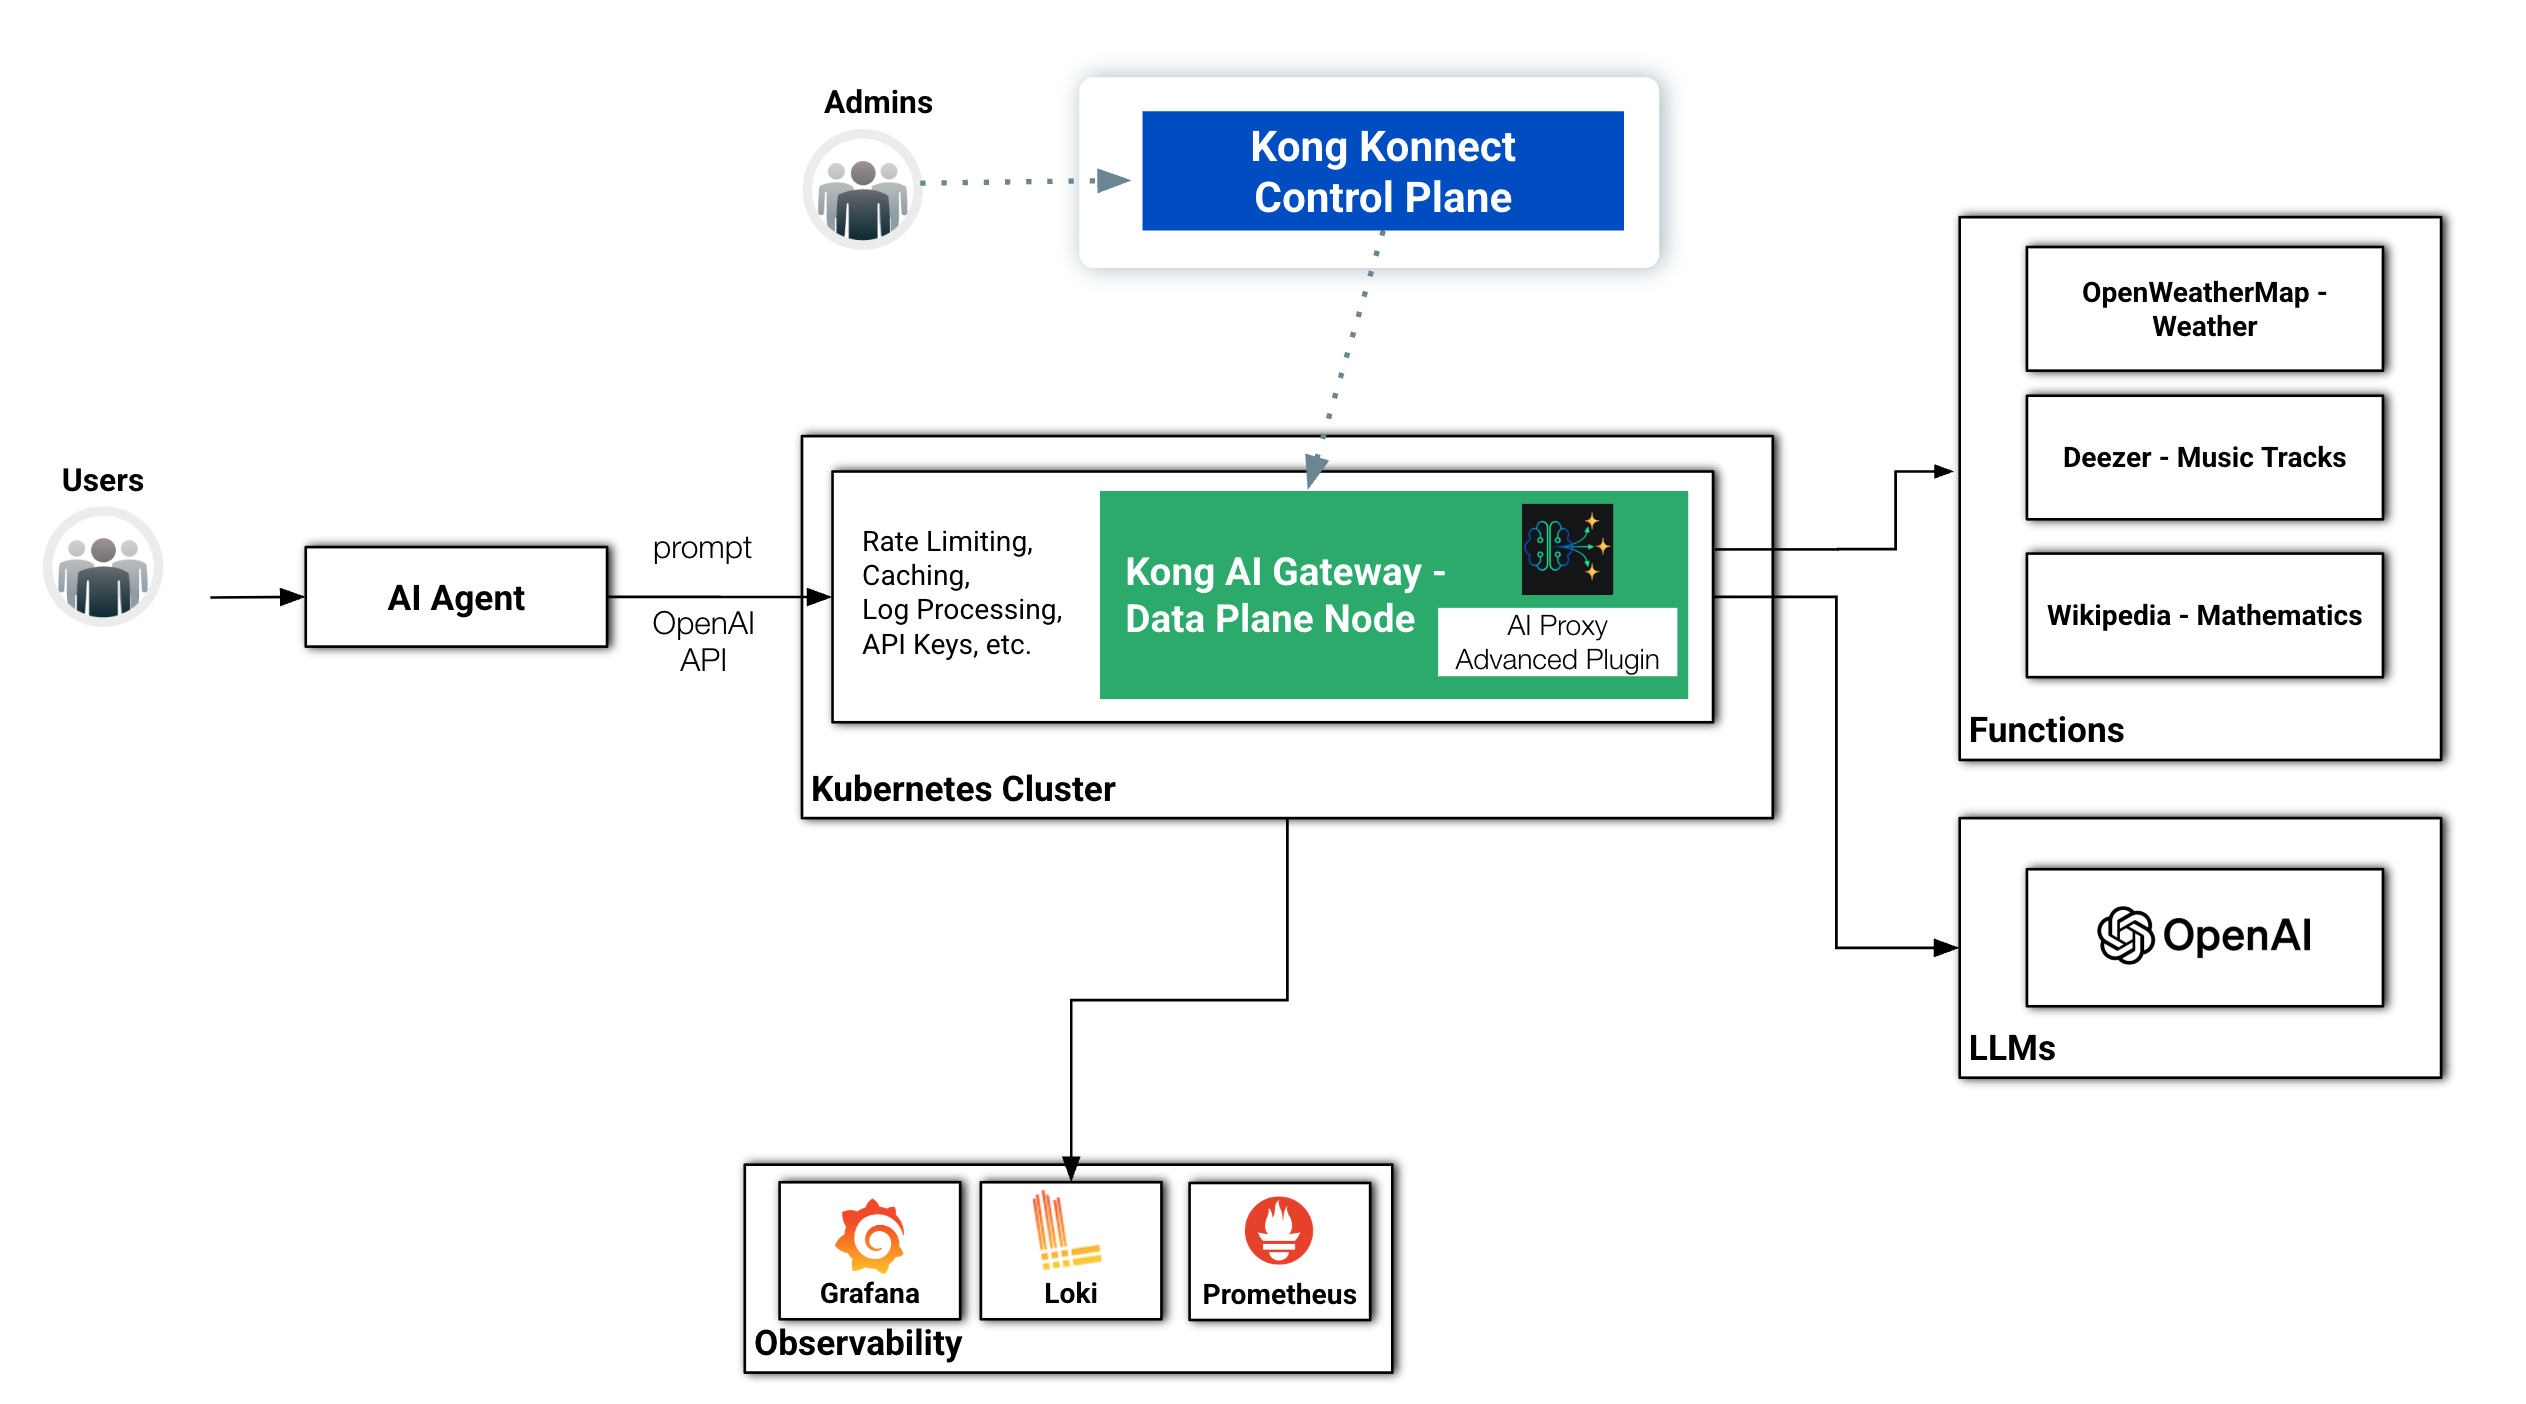
Kong AI Gateway によって保護される外部関数を備えたリファレンス アーキテクチャ
同じ LangGraph フレームワークを使用してはいますが、エージェントのオリジナル バージョンでは推論ループが実装されていません。つまり、呼び出されると、単にノードを実行し、LLM にリクエストを送信して結果を取得するだけです。このバージョンでは、推論ループを備えた完全な ReAct エージェントを実装しています。さらに、Kong AI Gateway を介して LLM モデルにアクセスします。
エージェントの主なステップは次のとおりです。
- 入力内容について考える。
- ツール (アクション) を選択する。
- ツールを呼び出して行動する。
- 結果を観察する。
- 最終的な答えにたどり着くまで繰り返す。
LangGraph のドキュメントには、主要なコンポーネントを持つエージェントについて説明しているページがあります。

コード
これが新しいエージェントです。
from typing import Annotated, TypedDict
from langgraph.graph import StateGraph, START, END
from langchain_core.messages import BaseMessage
from langchain_core.messages import SystemMessage
from langgraph.graph.message import add_messages
from langchain_openai import ChatOpenAI
from langchain_core.tools import tool
from langgraph.prebuilt import ToolNode

from langchain_community.utilities.openweathermap import OpenWeatherMapAPIWrapper
import httpx

class State(TypedDict):
    messages: Annotated[list[BaseMessage], add_messages]

@tool
def get_weather(location: str):
    """Call to get the weather from a specific location."""
    openweathermap_url = kong_dp + "/openweathermap-route"
    result = httpx.get(openweathermap_url, params={"q": location})
    return result.json()

@tool
def get_composer(piece: str):
    """Call to get the composer of a specific piece."""
    deezer_url = kong_dp + "/deezer-route"
    result = httpx.get(deezer_url, params={"q": piece})
    return result.json()["data"][0]["artist"]["name"]

@tool
def get_mathematician(theorem: str):
    """Call to get the mathematician of a specific theorem."""
    wikipedia_url = kong_dp + "/wikipedia-route"
    result = httpx.get(wikipedia_url, params={"srsearch": theorem})
    return result.json()["query"]["search"][0]

def call_model(state: State):
    system_prompt = SystemMessage(
        "You are a helpful AI assistant, please convert temperatures to Celsius."
    )
    response = client.invoke([system_prompt] + state["messages"])
    return {"messages": [response]}

# Define the conditional edge that determines whether to continue or not
def should_continue(state: State):
    messages = state["messages"]
    last_message = messages[-1]
    # If there is no function call, then we finish
    if not last_message.tool_calls:
        return "end"
    # Otherwise if there is, we continue
    else:
        return "continue"

def print_stream(stream):
    for s in stream:
        message = s["messages"][-1]
        if isinstance(message, tuple):
            print(message)
        else:
            message.pretty_print()

tools = [get_weather, get_composer, get_mathematician]
tool_node = ToolNode(tools)

builder = StateGraph(State)
builder.add_node("agent_node", call_model)
builder.add_edge(START, "agent_node")
builder.add_node("tool_node", tool_node)
builder.add_conditional_edges('agent_node', should_continue, {"continue": "tool_node", "end": END})
builder.add_edge("tool_node", "agent_node")

graph = builder.compile()
print(graph.get_graph().draw_ascii())

kong_dp = "http://localhost:80"
agent_url = kong_dp + "/agent-route"

client = ChatOpenAI(base_url=agent_url, model="", api_key="dummy", default_headers={"apikey": "123456"})
client = client.bind_tools(tools)

text = "What's the weather in the city where the composer of 'Like a Rolling Stone' was born?"

print("start streaming the graph")
inputs = {"messages": [("user", text)]}
print_stream(graph.stream(inputs, stream_mode="values"))
print("stop streaming the graph")
グラフ
この新しいエージェントのバージョンに追加した主な変更点は、グラフそのものです。まず、print(graph.get_graph().draw_ascii()) というコード行の結果を確認すると、次のような別の視覚表現が表示されます。
            +-----------+
            | __start__ |
            +-----------+
                  *
                  *
                  *
           +------------+
           | agent_node |
           +------------+
           ...         ...
          .               .
        ..                 ..
+-----------+           +---------+
| tool_node |           | __end__ |
+-----------+           +---------+
起こっていることを理解しやすくするために、グラフ定義のスニペットを分解してみましょう。
- 基本的に、グラフの定義は同じ 3 行から始まります。agent_node はcall_model 関数に関連付けられているため、最初のエージェント バージョンと同様に、LLM モデルにリクエストを送信する役割を担います。また、START ノードと agent_node ノードをつなぐ「normal edge」も定義します。
builder = StateGraph(State)
builder.add_node("agent_node", call_model)
builder.add_edge(START, "agent_node")
- 次に、すべてのツール関数 (get_weather、get_composer、get_mathematician) の配列である tool_nodes 変数に関連付けられた tool_node という名前の別のノードを作成します。
builder.add_node("tool_node", tool_node)- 次の行では、新しい LangGraph の構成要素である「条件付きエッジ」を追加します。ここでエージェントは、次に処理すべきノードを判断するための意思決定を行います。必要なパラメーターは次のとおりです。
- 開始ノード (この場合は agent_node)
- 次に呼び出すべきノードを決定する関数 (この場合は should_continue 関数)
- 関数の出力と実際のグラフ ノードを関連付けるマッピング。関数が continue を返した場合、次のノードは tool_node になり、そうでない場合、グラフは END ノードにルーティングされて終了します。
builder.add_conditional_edges('agent_node', should_continue, {"continue": "tool_node", "end": END})- 次の最後の行で 2 番目の「エッジ」を追加し、tool_node が agent ノードに関連付けられていることを示します。これは、グラフのループを適切に配置するために必要です。
builder.add_edge("tool_node", "agent_node")should_continue 関数は単純です。LLM からの最後のレスポンスがツール リクエストに関連していたかどうかをチェックします。関連していた場合、グラフは続行し、tool_node に戻り、LLM レスポンスで指示された別のツールを呼び出すことになります。そうでなければ、ループは終了します。
最後のコメントとして、call_model 関数は、取得した温度を摂氏 (°C) に変換するよう LLM に要求する SystemMessage をリクエストに追加します。
グラフのストリーム
最初のグラフは非常にシンプルで、単一のノードを持ち、推論ループはありませんでした。確認できるように、state = graph.invoke(state) の行はグラフを呼び出し、グラフから返されたレスポンスとともに新しい状態 (State) を取得します。
今回、このグラフはループを実装しているため、グラフの実行を異なる方法で処理する必要があります。以前と同じようにグラフを呼び出すこともできますが、もっと面白い方法として、代わりに CompiledStateGraph.stream メソッドを使用することです。この新しいメソッドは、グラフのループから返されるレスポンスを使用して、グラフのステップをストリーミングします。このコードは values として stream_mode を使用しており、各ステップの後に状態 (state) のすべての値を出力します。
グラフをストリーミングすると、次のような非常に有用な出力が生成されます。グラフが扱うさまざまな種類のメッセージ (「Human Message」、LLM からの「AI Message」、ツールからの「Tool Message」) を記述していることに注目してください。
start streaming the graph
================================ Human Message =================================
What's the weather in the city where the composer of 'Like a Rolling Stone' was born?
================================== Ai Message ==================================
Tool Calls:
get_composer (call_EhAHCD9CqwLbKNiRWM7go0BS)
Call ID: call_EhAHCD9CqwLbKNiRWM7go0BS
Args:
piece: Like a Rolling Stone
================================= Tool Message =================================
Name: get_composer
Bob Dylan
================================== Ai Message ==================================
Bob Dylan was born in Duluth, Minnesota. Let's find out the weather.
Tool Calls:
get_weather (call_L6jl2wlo6Ruf0hEK8h3ddaI1)
Call ID: call_L6jl2wlo6Ruf0hEK8h3ddaI1
Args:
location: Duluth, Minnesota
================================= Tool Message =================================
Name: get_weather
{"coord": {"lon": -92.1066, "lat": 46.7833}, "weather": [{"id": 804, "main": "Clouds", "description": "overcast clouds", "icon": "04d"}], "base": "stations", "main": {"temp": 278.12, "feels_like": 275.96, "temp_min": 276.86, "temp_max": 280.56, "pressure": 1016, "humidity": 91, "sea_level": 1016, "grnd_level": 982}, "visibility": 10000, "wind": {"speed": 2.57, "deg": 100}, "clouds": {"all": 100}, "dt": 1746213924, "sys": {"type": 2, "id": 2086417, "country": "US", "sunrise": 1746183078, "sunset": 1746235157}, "timezone": -18000, "id": 5024719, "name": "Duluth", "cod": 200}
================================== Ai Message ==================================
The temperature in Duluth, Minnesota, where Bob Dylan was born, is currently 278.12 Kelvin. Let's convert that to Celsius.
The formula to convert from Kelvin to Celsius is: C = K - 273.15
So, 278.12 Kelvin is approximately 5 degrees Celsius.
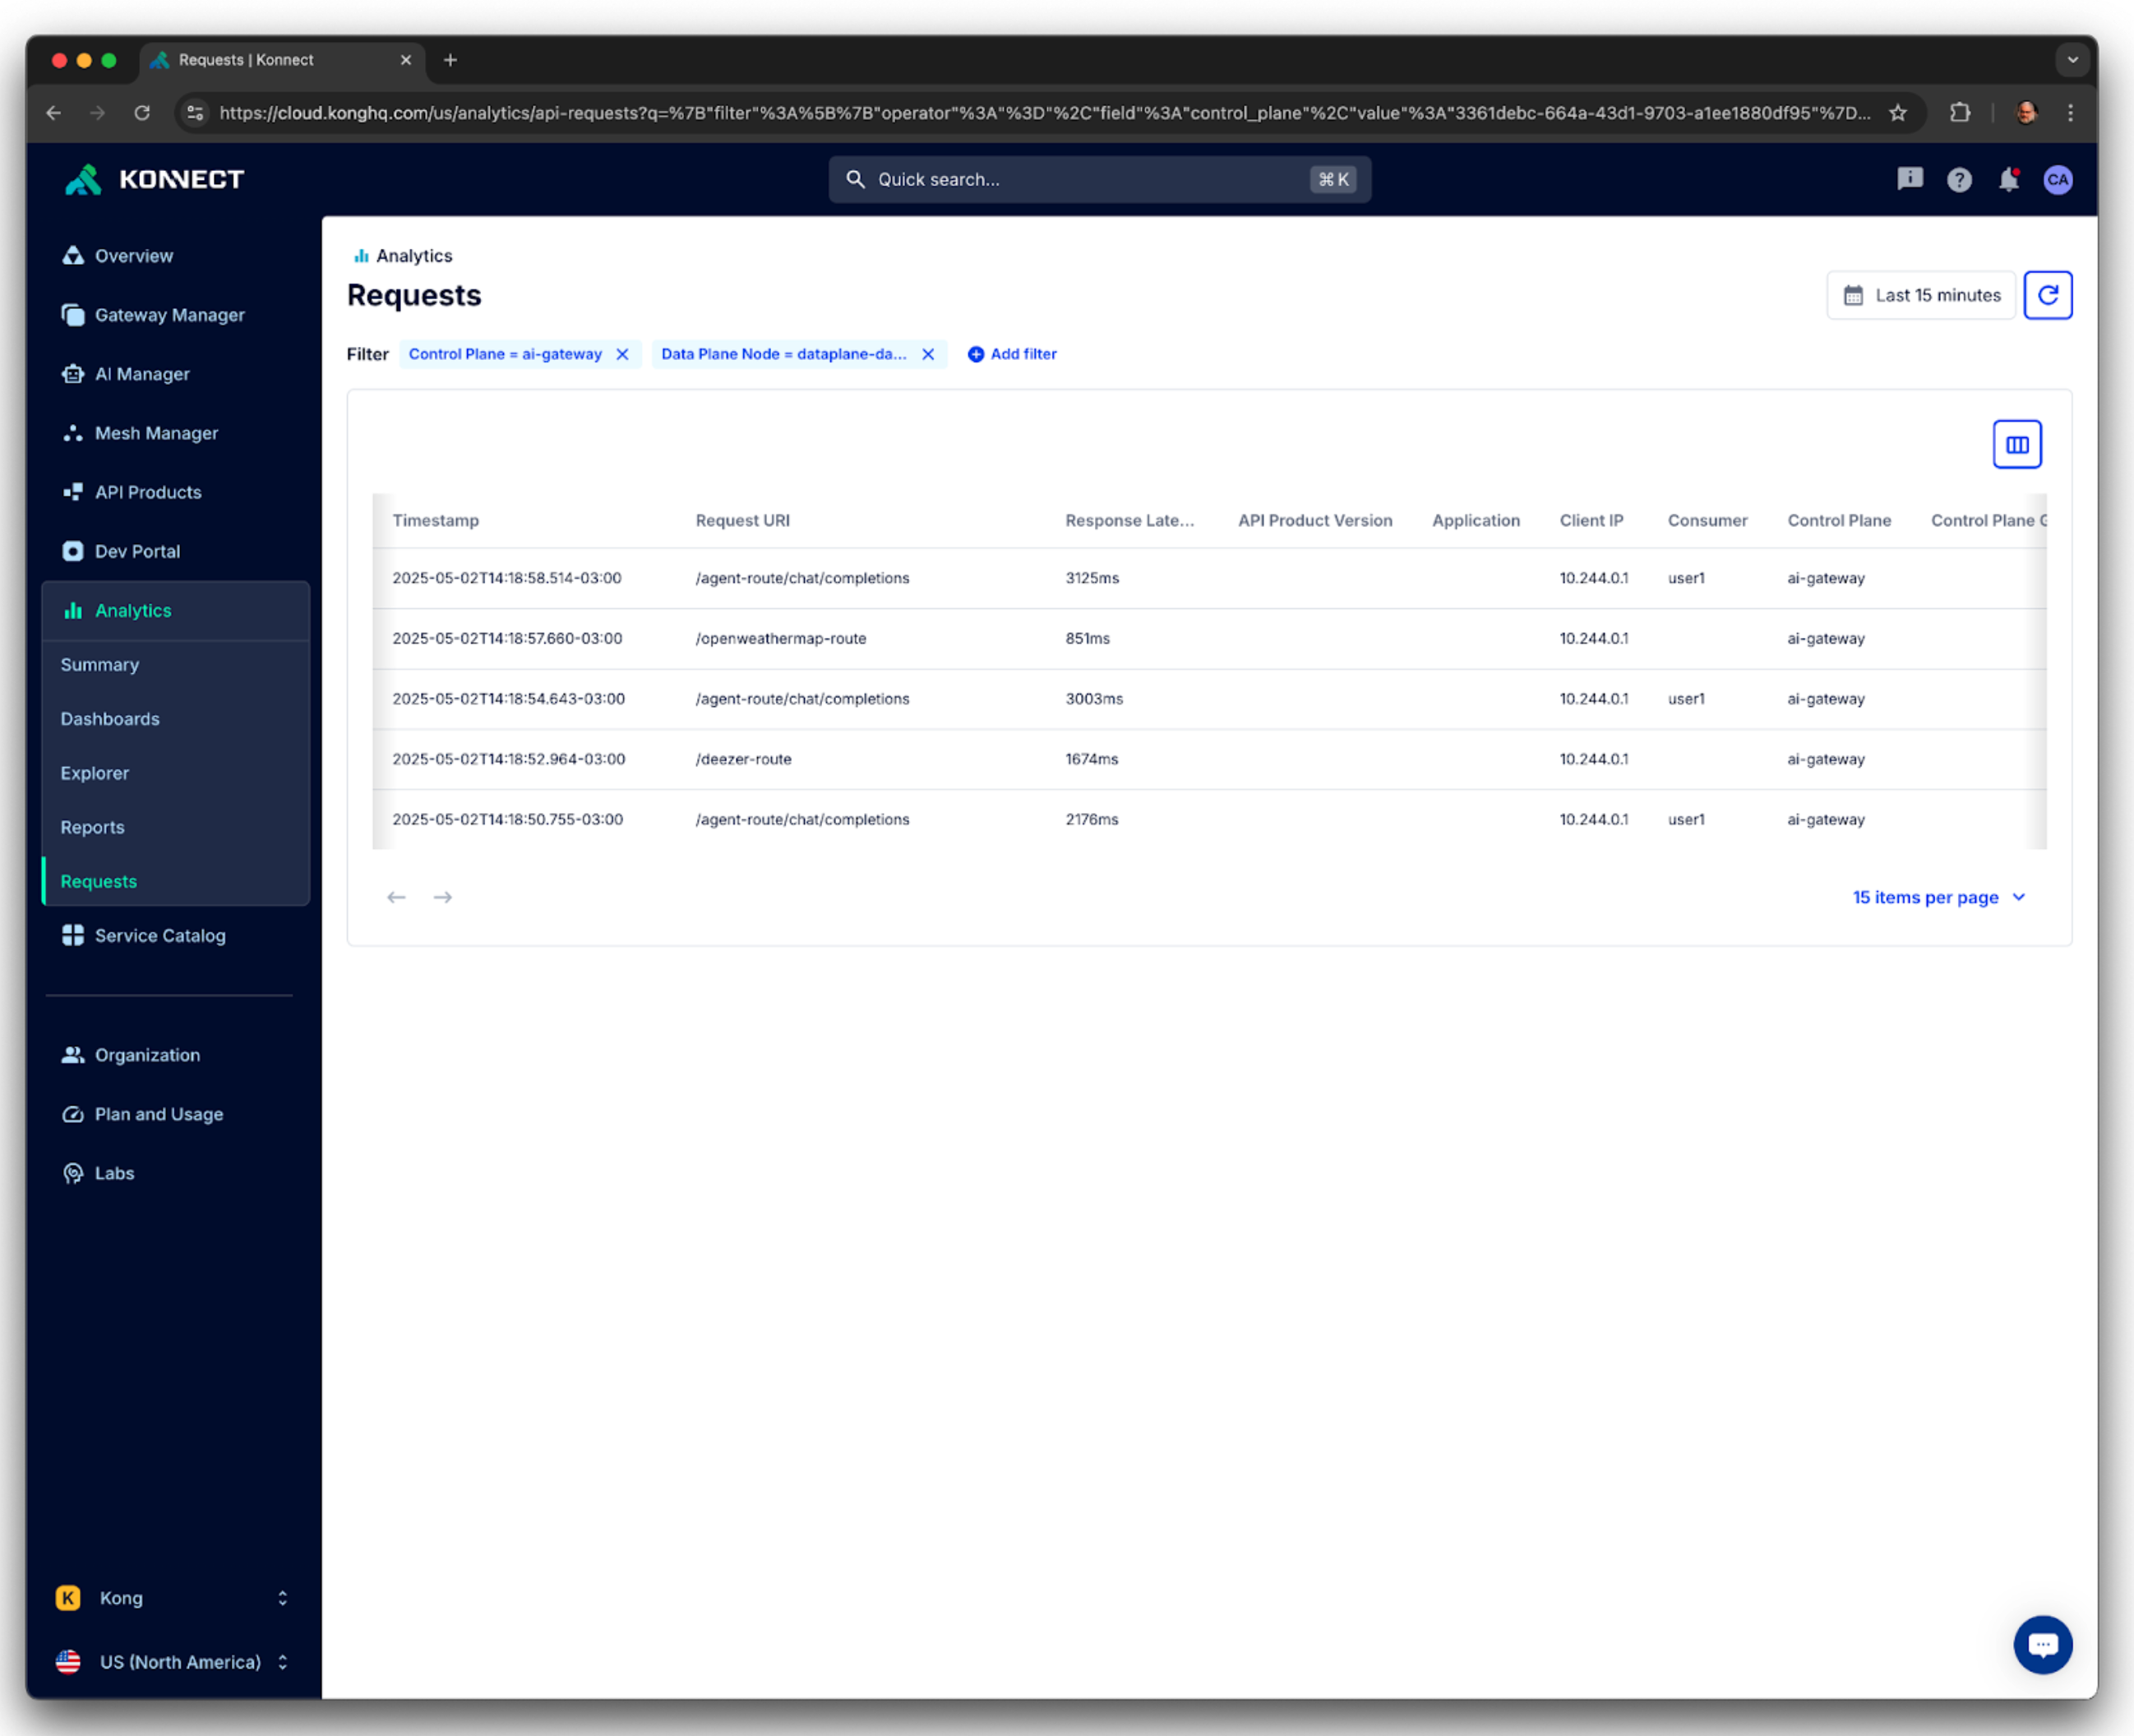
stop streaming the graphGatewayが処理したリクエストは、オブザービリティ レイヤーや Konnect UI が提供する Analytics 機能を使用して確認できます。たとえば、以下は AI エージェントに関連するリクエストです。
状態(State)
コードに関連するもう 1 つの変更点は、AI エージェントの状態 (State) です。最初のエージェントとは異なり、現在の状態は次のように定義されています。
class State(TypedDict):
    messages: Annotated[list[BaseMessage], add_messages]
基本的に、状態は Annotated 型に基づく message というキーが1つしかありません。Annotated 型は、以下を指定します。
- BaseMessage メッセージのリスト。
- 状態 (State) に対する add_messages というreducer 関数。StateGraph で使用される add_messages 関数は、LLM モデルとツールから受信したメッセージを追加します。
LLM モデルとツールから返される複数のレスポンスを管理しているため、状態 (State) をメッセージのリストとして作成することは理にかなっており、役に立ちます。さらに、Annotated 型は通常の文字列のリストを指定することもできます。しかし、BaseMessage クラスの方が適切と思われます。これは、ユーザー入力用の HumanMessage や LLM レスポンス用の AIMessage など、これから扱う他のすべてのメッセージ クラスの基底クラスであるためです。
ツール
各ツールは外部サービスを呼び出しています。この例では次のようになります。
- get_weather: 公開されている OpenWeather サービスを呼び出し、指定された場所の天気情報を取得します。
- get_composer: 公開されている RapidAPI の Deezer サービスを利用して、特定の楽曲の作曲者を管理します。
- get_mathematician: Wikipedia にリクエストを送信し、定理に関する情報を取得します。
重要な点は、図に示されているように、これらの関数に関連するエンドポイントも Kong AI Gateway によって保護されていることです。つまり、Gatewayが提供する機能を活用してポリシーを実装できることになります。
decK 宣言
外部サービスは、呼び出しに特定の API キーを要求する場合があります。Gatewayのポリシーの一例として、Gatewayがサービスの前面に位置しているため、API キーの管理をGatewayに任せることが容易になります。以下は、3 つの外部サービスのエンドポイントに対する decK 宣言です。
_format_version: "3.0"
_info:
  select_tags:
  - agent
_konnect:
  control_plane_name: ai-gateway
services:
- name: openweathermap-service
  url: https://api.openweathermap.org/data/2.5/weather
  routes:
  - name: openweathermap-route
    paths:
    - /openweathermap-route
    plugins:
    - name: request-transformer
      instance_name: request-transformer-openweathermap
      config:
        add:
          querystring:
          - "appid:<your_openweathermap_api_key>"
- name: deezer-service
  url: https://deezerdevs-deezer.p.rapidapi.com/search
  routes:
  - name: deezer-route
    paths:
    - /deezer-route
    plugins:
    - name: request-transformer
      instance_name: request-transformer-deezer
      config:
        add:
          headers:
          - "x-rapidapi-key:<your_rapidapi_deezer_api_key>"
- name: wikipedia-service
  url: https://en.wikipedia.org/w/api.php
  routes:
  - name: wikipedia-route
    paths:
    - /wikipedia-route
    plugins:
    - name: request-transformer
      instance_name: request-transformer-wikipedia
      config:
        add:
          querystring:
          - "action:query"
          - "list:search"
          - "format:json"
- name: agent-service
  host: localhost
  port: 32000
  routes:
  - name: agent-route1
    paths:
    - /agent-route
    plugins:
    - name: ai-proxy-advanced
      instance_name: "ai-proxy-advanced-agent"
      enabled: true
      config:
        targets:
        - model:
            provider: "openai"
            name: "gpt-4"
          auth:
            header_name: "Authorization"
            header_value: "Bearer <your_openai_api_key>"
          route_type: "llm/v1/chat"
          logging:
            log_payloads: true
            log_statistics: true
    - name: key-auth
      instance_name: key-auth1
      enabled: true
consumers:
- keyauth_credentials:
  - key: "123456"
  username: user1
  plugins:
  - name: ai-rate-limiting-advanced
    instance_name: ai-rate-limiting-advanced-consumer1
    enabled: true
    config:
      llm_providers:
      - name: openai
        window_size:
        - 60
        limit:
        - 800
この宣言は、外部サービスごとに Kong サービスと Kong ルートを作成します。Request Transformer プラグインを使用すると、外部サービスが必要とする API キーを挿入できます。これで、API キーを管理するセキュアなソリューションが提供されます。以前述べたように、本番環境では、キーの保存に Secrets Manager を活用することをお奨めします。
さらに、Gatewayは、エージェントの観点から、各外部サービスが公開するエンドポイント アドレスを抽象化します。この柔軟性により、外部サービスに加えるどのような変更もエージェントに影響をおよぼさないという透明性が得られます。
LangGraph のリーズニング
新しいエージェントのコードを見ると、LangGraph では、推論が 3 つの異なるタイミングで発生する可能性があることが分かります。
- ノード内 : プロンプトと中間状態に基づいて入力を処理し、出力を生成します。これは、たとえば、ReAct パターンを実装すべきであると述べるためにプロンプト エンジニアリングを使用した最初のエージェントで起こったことです。
- 条件付きエッジ : 論理的なフローと意思決定をモデル化できます。
- 状態 : メモリとして機能し、グラフの進行とともに進化します。推論には、この状態の読み書きを行い、思考、意思決定、または部分的な結果を追跡することが含まれます。
このシリーズのパート 3 では、AI エージェントをさらに進化させ、複数の LLM インフラストラクチャにまたがるセマンティック ルーティングを実装します。
原文:How to Build a Single LLM AI Agent with Kong AI Gateway and LangGraph